Go 语言Channel 通道详解
在上一章节中,我们讨论了Go中的协程(Goroutine) 以及如何使用 Goroutines 在 Go 中实现并发。在本章节中,我们将讨论通道(channel)以及 Goroutines 如何使用通道进行通信。
什么是通道?
通道可以被认为是使用 Goroutine 进行通信的管道。类似于水在管道中从一端流向另一端的方式,数据可以从一端发送并使用通道从另一端接收。

声明通道
每个通道都有一个与之关联的类型。这种类型是允许通道传输的数据类型。不允许使用通道传输其他类型。
chan T 是一个类型为T的通道
声明一个通道的语法如下
var varname chan T
其中 chan 是声明一个通道的关键字。 T表示该通道的类型,可以是 int, string 等。
通道的零值是nil。nil 通道没有任何用处,因此必须使用make()像定义 maps 和 slices 一样来定义通道。
让我们看下面声明通道的代码。
package main

import "fmt"

func main() {
    var a chan int
    if a == nil {
        fmt.Println("channel a 是 nil, 现在去定义 a ")
        a = make(chan int)
        fmt.Printf("a 的类型是 %T\n", a)
    }
}
上面代码输出如下
channel a 是 nil, 现在去定义 a
a 的类型是 chan int
程序开始声明一个通道 a。通道的零值是nil。因此,我们可以使用if条件进行判断通道 a 是否为 nil。如果为 nil则定义通道。a在上面的程序中是一个 int 通道。
像往常一样,简写声明也是定义通道的有效且简洁的方式。
a := make(chan int)
从通道发送和接收数据
下面给出了从通道发送和接收数据的语法
data := <- a // 从 channel a  读取数据
a <- data // 向 channel a  写入数据
箭头相对于通道的方向指定是发送还是接收数据。
在第一行中,箭头指向外面a,因此我们从 channel 中读取a并将值存储到变量中data。
在第二行中,箭头指向a,因此我们正在写入 channel a。
默认情况下发送和接收是阻塞的
默认情况下,对通道的发送和接收是阻塞的。这是什么意思?当数据发送到通道时,控制在发送语句中被阻塞,直到其他 Goroutine 从该通道读取。类似地,当从通道读取数据时,读取会被阻塞,直到某个 Goroutine 将数据写入该通道。
通道的这种特性有助于协程之间有效地进行通信,而无需使用其他编程语言中很常见的显式锁或条件变量。
通道示例程序
让我们编写一个程序来理解 Goroutines 如何使用通道进行通信。
我们实际上将在这里使用通道重写我们在学习Goroutines时编写的程序。
让我在这里引用上一个章节中的程序。
package main

import (
    "fmt"
    "time"
)

func hello() {
    fmt.Println("Hello goroutine!")
}
func main() {
    go hello()
    time.Sleep(1 * time.Second)
    fmt.Println("main function")
}
这是上一个教程中的程序。我们在这里使用 sleep 来让主协程等待运行 hello() 的协程完成。
我们将使用通道重写上述程序。
package main

import (
    "fmt"
)

func hello(done chan bool) {
    fmt.Println("Hello goroutine!")
    done <- true
}
func main() {
    done := make(chan bool)
    go hello(done)
    <-done
    fmt.Println("main function")
}
在上面的程序中,我们创建了一个 bool 通道 done。并将其作为参数传递给 hello 协程。接下来我们正在从done通道接收数据。这行代码是阻塞的,这意味着在某些 Goroutine 将数据写入done通道之前,控制器不会移动到下一行代码。因此,这消除了 time.Sleep 原始程序中存在的防止主 Goroutine 退出的需要。
这行代码<-done 从 done 通道接收数据,但是我们不使用这些数据,也不将这些数据存储在任何变量中。这是完全合法的。
现在我们的主协程被阻塞,等待 done 通道上的数据。hello 协程接收该通道道作为一个参数,打印“Hello goroutine!”,然后将 true 写入到 done 通道。当这个写操作完成时,主协程从 done 通道接收数据,然后它开始执行,文“main function”被打印出来。
上述代码执行结果如下
Hello goroutine!
main function
让我们重写这个程序,在hello协程中引入 sleep ,以便可以更好地理解这个阻塞概念。
package main

import (
    "fmt"
    "time"
)

func hello(done chan bool) {
    fmt.Println("hello 协程还没睡醒 :(")
    time.Sleep(4 * time.Second)
    fmt.Println("hello 协程睡醒了,接下来要开始工作了")
    done <- true
}
func main() {
    done := make(chan bool)
    fmt.Println("Main 要去创建一个hello 协程,并执行")
    go hello(done)
    <-done
    fmt.Println("Main 收到了数据了 :)")
}
在上面的程序中,我们在 hello 协程的开始执行了 4 秒的睡眠。
上述代码执行结果如下
Main 要去创建一个hello 协程,并执行
hello 协程还没睡醒 :(
hello 协程睡醒了,接下来要开始工作了
Main 收到了数据了 :)
该程序将首先打印 “Main 要去创建一个hello 协程,并执行”。然后 hello 协程将启动并打印 “hello 协程还没睡醒 :( ”。打印后,hello 协程休眠 4 秒,在此期间主协程 将被阻塞,因为它正在等待来自 done 通道的数据,<-done。4 秒后hello 协程将继续打印“hello 协程睡醒了,接下来要开始工作了”。然后将 true 写入通道。主协程收到数据后,将打印“*Main 收到了数据了 :)*”。
死锁
使用通道时要考虑的一个重要因素是死锁。如果一个 Goroutine 在一个通道上发送数据,那么预计其他一些 Goroutine 应该接收数据。如果没有发生这种情况,那么程序将在运行时发生死锁。

类似地,如果一个 Goroutine 正在等待从通道接收数据,那么其他 Goroutine 会在该通道上写入数据,否则程序会崩溃。
package main

func main() {
    ch := make(chan int)
    ch <- 5
}
在上面的程序中,创建了一个通道 ch,然后我们发送5到通道中ch <- 5。
在这个程序中,没有其他协程从通道 ch 中接收数据。此,该程序将在运行时产生以下错误。
fatal error: all goroutines are asleep - deadlock!

goroutine 1 [chan send]:
main.main()
        /workspace/go/src/study/main.go:5 +0x31
exit status 2
单向通道
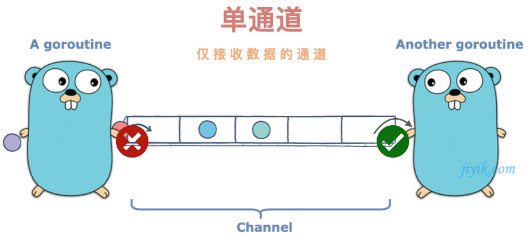
到目前为止我们讨论的所有通道都是双向通道,即数据可以在它们上发送和接收。也可以创建单向通道,即仅发送或接收数据的通道。
package main

import "fmt"

func sendData(sendch chan<- int) {
    sendch <- 10
}

func main() {
    sendch := make(chan<- int)
    go sendData(sendch)
    fmt.Println(<-sendch)
}
在上面的程序中,我们创建了仅用来发送数据的通道 sendch。chan<- int表示一个只进行发送的通道,箭头指向 chan。
我们尝试从仅发送通道接收数据。这是不允许的,当程序运行时,编译器会报如下错误
# command-line-arguments
./main.go:12:14: invalid operation: <-sendch (receive from send-only type chan<- int)
如果无法读取,则写入仅发送通道有什么意义!

这就是通道转换功能的用处。可以将双向通道转换为仅发送或仅接收的单通道,但反之则不行。
package main

import "fmt"

func sendData(sendch chan<- int) {
    sendch <- 10
}

func main() {
    chnl := make(chan int)
    go sendData(chnl)
    fmt.Println(<-chnl)
}
上述代码执行结果如下
10
在上面的程序中,创建了一个双向通道 chnl。它作为参数传递给第 sendData 协程。sendData函数通过参数sendch chan<- int将此通道转换为仅能发送的通道 sendch。所以现在通道只在sendData协程内部发送数据,但它在主协程中是双向的。
关闭通道和通道上的 for range 循环
发送方可以关闭通道以通知接收方不再有数据在通道上发送。
接收者可以在从通道接收数据时使用一个额外的变量来检查通道是否已经关闭。
v, ok := <- ch
如果ok的值是通过成功的发送操作从通道上接收到,则为真。否则为假,表示我们正在从关闭的通道读取数据。
从关闭通道读取的值将是通道类型的零值。例如,如果通道是一个int类型的通道,那么从关闭的通道接收到的值将是 0。
package main

import (
    "fmt"
)

func producer(chnl chan int) {
    for i := 0; i < 10; i++ {
        chnl <- i
    }
    close(chnl)
}
func main() {
    ch := make(chan int)
    go producer(ch)
    for {
        v, ok := <-ch
        if ok == false {
            break
        }
        fmt.Println("Received ", v, ok)
    }
}
在上面的程序中,producer协程将 0 到 9 写入 chnl 通道,然后关闭通道。main 函数有一个无限循环 for,它使用变量 ok 检查通道是否关闭。如果ok为假,则表示通道已关闭,因此循环中断。否则打印接收到的值和 ok 变量的值。
因此上述代码执行结果如下
Received  0 true
Received  1 true
Received  2 true
Received  3 true
Received  4 true
Received  5 true
Received  6 true
Received  7 true
Received  8 true
Received  9 true
for 循环的for range形式可用于从通道接收值,直到通道关闭。
让我们使用 for range 循环重写上面的程序。
package main

import (
    "fmt"
)

func producer(chnl chan int) {
    for i := 0; i < 10; i++ {
        chnl <- i
    }
    close(chnl)
}
func main() {
    ch := make(chan int)
    go producer(ch)
    for v := range ch {
        fmt.Println("Received ", v)
    }
}
for range循环从 ch 通道接收数据,直到它关闭。一旦ch关闭,循环自动退出。上述代码执行结果如下
Received  0
Received  1
Received  2
Received  3
Received  4
Received  5
Received  6
Received  7
Received  8
Received  9
通道中还有有更多的概念,例如缓冲通道、工作池和 select。我们将在其他章节中中讨论它们。
