使用socket.io 实现群聊天室
本篇向大家分享一个socket.io的使用实例,实现群聊天的功能。如果想使用socket.io那么必须借助于nodejs来实现服务端,因此我们需要在nodejs中安装socket.io
安装socket.io
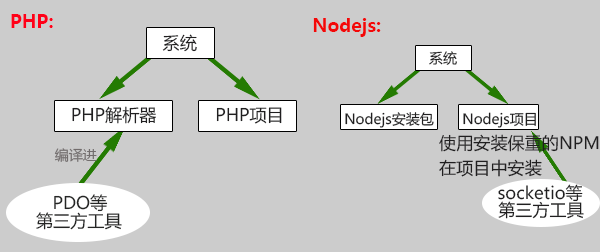
那如何在nodejs下安装socket.io呢,对于刚开始学习nodejs的人来说可能会碰到一些问题。完成一个nodejs的项目需要两部分,一是nodejs工具的安装目录也就是相当于PHP的解析器,还有一个就是nodejs代码部分。而socket.io可以说是nodejs的一个工具包,如果我们学过PHP的话,那如果我们需要使用PHP中的扩展工具的话,都需要再重新编译PHP解析器。但是对于nodejs来说,它的第三方工具都要在nodejs代码部分安装。我们可以用下图来对比

那么接下来介绍一下我们的目录结构
首先是我们的nodejs环境在根目录下面
/nodejs
然后是我们的项目所在目录
/www/nodejs
接下来我们进入项目所在目录
# cd /www/nodejs
然后使用 /nodejs/bin 下面的npm 命令来安装socket.io 到项目目录下面
nodejs]# /nodejs/bin/npm install socket.io
安装完成以后,我们可以在项目目录下面新建js文件,名称为socketserver.js
socketserver.js
var http = require('http').createServer(handle);
var io = require('socket.io')(http);
var url = require('url');
var files = require('fs');
http.listen(9999,"192.168.144.128");//监听9999端口
function handle(req,res){
files.readFile(__dirname + '/index.html',
function (err, data) {
if (err) {
res.writeHead(500);
return res.end('Error loading index.html');
}
res.writeHead(200);
res.end(data);
});
}
var onlineUsers = {};
//当前在线人数
var onlineCount = 0;
/**
* 用户连接
*/
io.on('connection',function(socket){
/**
* 监听新用户加入
*/
socket.on('login',function(obj){
io.emit('login',{username:obj.username});
onlineCount++
});
/**
* 发布消息
*/
socket.on('message',function(obj){
io.emit('message',{username:obj.username,userid:obj.userid,message:obj.message});
});
/**
* 上传文件
*/
socket.on('upfile',function(obj){
var dir = __dirname.substr(0,__dirname.lastIndexOf('module'));
var file = dir+"data/Upload/"+obj.filename;
files.open(file,'w',function(err,fd){
if(!err){
var option ={
flags: 'w',
encoding: null,
fd: fd,
mode: 0666
};
var ws = files.createWriteStream(file,option);
ws.write(obj.message);
io.emit('upfile',{username:obj.username,userid:obj.userid,message:"/data/Upload/"+obj.filename});
}
});
console.log(dir);
});
});
上面是服务端代码
接下来完成客户端的代码
chatclient.js
var CHAT = {
username:null,
userid: null,
message:null,
}
var socket = io.connect('ws://192.168.144.128:9999');
socket.on('login',function(obj){
var con = $('#chat_show .show_message').html()+"<br />"+obj.username+'---joined';
$('#chat_show .show_message').html(con);
});
socket.on('message',function(obj){
var info = '';
if(CHAT.userid == obj.userid){
info = "<span style='display:block;width:100%;text-align:right;'>"+obj.username+': '+obj.message+"</span>";
}else{
info = "<span style='display:block;width:100%;text-align:left;'>"+obj.username+': '+obj.message+"</span>";
}
var con = $('#chat_show .show_message').html()+info;
$('#chat_show .show_message').html(con);
});
socket.on('upfile',function(obj){
var info = '';
if(CHAT.userid == obj.userid){
info = "<span style='display:block;width:100%;text-align:right;'>"+obj.username+":<img src='"+obj.message+"' width='100' height='100' /></span>";
}else{
info = "<span style='display:block;width:100%;text-align:left;'>"+obj.username+": <img src='"+obj.message+"' width='100' height='100' /></span>";
}
var con = $('#chat_show .show_message').html()+info;
$('#chat_show .show_message').html(con);
});
socket.emit('login',{username:CHAT.username});
以上是客户端的核心代码
综合以上的代码,有两个知识点需要注意。
一是 socket.on(“事件名称”,function(){处理代码})。不管是在服务端还是在客户端,这是在socket上开启一个方法,进行监听,一旦有数据向这个方法发送数据,就会调用后面的function()进行处理。
那如何向这个事件发送数据,那就需要用到 socket.emit(“事件名称”,数据);来向对方发送数据,双方的事件名称是相互对应的。客户端的emit-事件名称对应服务端的 on-事件名称;服务端的emit-事件名称对应于客户端的on-事件名称。
如此我们就完成了群聊天的功能,当然上述代码是不完整的,不过核心的代码都在上面,缺少的就是页面了。大家可以根据上面的代码自行进行扩展,制作出更强大的网页聊天室。如果有什么问题请在下面留言讨论,大家共同提高
相关文章
Network Interfaces in Linux
发布时间:2025/04/20 浏览次数:131 分类:OPERATING SYSTEM
-
/etc/network/interfaces This article will look at the complete syntax explanation in Debian and its derivatives . The file /etc/network/interfaces allows you to assign static and dynamic IP addresses to interfaces, configure routing informa
AJAX calls in Node.js
发布时间:2025/04/17 浏览次数:103 分类:Node.js
-
Representational State Transfer is abbreviated as REST . An API or Web API (Application Programming Interface) that complies with the restrictions and limitations of the REST architectural style and allows interaction with RESTful web servi
module.exports in Node JS
发布时间:2025/04/17 浏览次数:96 分类:Node.js
-
In Node js, module.export modules are exposed on the server side and provided in CommonJS format. Node js modules can be called as pre-built code packages that contain javascript objects and functions and can be used by external application
PHP with Ajax
发布时间:2025/04/13 浏览次数:140 分类:PHP
-
We will use PHP and ajax by printing a simple sum of two numbers 2 and . Also, print a php array in JSON. 3 object We will also use PHP with ajax by getting the HTML formatted output from the number division in PHP. Printing simple addition
How to use the Linux file remote copy command scp
发布时间:2025/04/08 浏览次数:151 分类:OPERATING SYSTEM
-
Scp copies files between two hosts over the network, and the data is encrypted during transmission. Its underlying layer uses ssh for data transmission. And it has the same authentication mechanism and the same security level as ssh. When u
Nodejs automatically restarts after modifying the code
发布时间:2025/04/08 浏览次数:93 分类:OPERATING SYSTEM
-
NodeJs can automatically restart after modifying the code, saving us the trouble of ctr+c and then using node. But in terms of time, if the project is already online and running normally, and there are not many modifications, then we can do
Adding network mode in Docker Compose
发布时间:2025/03/25 浏览次数:138 分类:Docker
-
By default, a single network is created by Docker Compose in our application and each container is added there as a service. Every container on the network can be accessed and found by containers on the single network. We can configure our
Using Docker network host commands
发布时间:2025/03/24 浏览次数:51 分类:Docker
-
Docker containers work by leveraging network drivers that are created during the installation of Docker. The default drivers available to us include bridge and host networking. When we create containers without specifying a network, they ar
Mapping a network drive in a batch script
发布时间:2025/03/21 浏览次数:73 分类:OPERATING SYSTEM
-
This article will discuss how to map a network drive in a batch script. Mapping a network drive in a batch script For this purpose, we will see three formats of the same command. However, the general format of the command is: net use P: "\\

