AngularJS 自动完成功能
出于多种原因,自动完成功能是一种使生活更轻松的功能。 它使写出文本变得更容易和更快,因为当在输入栏中键入字母时,会显示我们尝试制作的单词的建议和预测。
此外,如果我们希望检查某个特定名称是否在名称列表中,自动完成功能会在我们键入时建议名称,从而可以更快地梳理列表,就像伪 Ctrl+F 一样。
在 Angular 框架中,有多种方法可以使用自动完成功能。
使用 REST API 和 Bootstrap 实现 AngularJS 自动完成
要在此方法中创建自动完成功能,我们将从 Bootstrap 获取结构和样式。 然后我们将使用 REST API 获取要搜索的数据。
对于初学者,我们将使用 ng new autocomplete 创建一个新文件,然后我们需要创建一个服务文件。 这是我们将放置使用 REST API 获取数据的代码的文件。
接下来,我们前往 getbootstrap.com,点击 Get Started,然后在 CSS 标题下,我们复制链接并将其粘贴到 index.html 文件的 head 标签中,如下所示:
代码片段- index.html:
<!doctype html>
<html lang="en">

<head>
  <meta charset="utf-8">
  <title>NgAutoComplete</title>
  <base href="/">
  <meta name="viewport" content="width=device-width, initial-scale=1">
  <link rel="icon" type="image/x-icon" href="favicon.ico">
  <link href="https://cdn.jsdelivr.net/npm/bootstrap@5.1.3/dist/css/bootstrap.min.css" rel="stylesheet"
    integrity="sha384-1BmE4kWBq78iYhFldvKuhfTAU6auU8tT94WrHftjDbrCEXSU1oBoqyl2QvZ6jIW3" crossorigin="anonymous">

</head>

<body>
  <app-root></app-root>
</body>

</html>
然后我们导航到 app.component.html 文件以使用 Bootstrap 创建页面结构。 在 Bootstrap 页面上,搜索自动完成,复制 Datalists 下的代码片段并粘贴。
然后我们将调整代码片段以适应我们将搜索的数据,如下所示:
代码片段- app.component.html:
<div class="container">
  <div class="row">
    <div class="col-md-12">
      <form class="form mt-5">
        <label for="exampleDataList" class="form-label">Datalist example</label>
        <input class="form-control" list="datalistOptions" id="exampleDataList" placeholder="Type to search..."
          (change)="nameValue($any($event.target).value)">
        <datalist id="datalistOptions">
          <option *ngFor="let post of posts" [value]="post.name">
        </datalist>
      </form>
    </div>
  </div>
  <div class="row mt-5" *ngIf="username">
    <div class="col-sm-4">
      <div class="card purple">
        <h3 class="title">{{username}}</h3>
      </div>
    </div>
  </div>
</div>
我们将使用 ngFor 函数来呈现我们从列表中选择的不同名称的网页。 然后我们在 app.component.ts 中构建代码以获取我们从 auto.service.ts 文件生成的数据; 最后,它应该是这样的:
代码片段- app.component.ts:
import { Component, OnInit } from '@angular/core';
import { AutoService } from './auto.service';

@Component({
  selector: 'app-root',
  templateUrl: './app.component.html',
  styleUrls: ['./app.component.css'],
})
export class AppComponent implements OnInit {
  title = 'autocomthree';
  posts!: any;
  username: any;
  constructor(private service: AutoService) { }
  ngOnInit() {
    this.getAllData();
  }
  getAllData() {
    this.service.getData().subscribe((res: any) => {
      this.posts = res;
      console.log(this.posts);
    });
  }
  nameValue(name: any) {
    this.username = name;
    console.log(this.username);
  }
}
app.module.ts 是我们导入应用程序运行所需的依赖项/模块的地方,因此我们的 app.module.ts 应该如下所示:
代码片段- app.module.ts:
import { NgModule } from '@angular/core';
import { BrowserModule } from '@angular/platform-browser';
import { FormsModule, ReactiveFormsModule } from '@angular/forms';
import { HttpClientModule } from '@angular/common/http';
import { AppComponent } from './app.component';

@NgModule({
  declarations: [AppComponent],
  imports: [BrowserModule, HttpClientModule, ReactiveFormsModule, FormsModule],
  providers: [],
  bootstrap: [AppComponent],
})
export class AppModule {}
我们现在需要生成我们想要在自动完成应用程序中使用的数据。 在终端的项目文件夹中,我们使用 ng g s auto 安装服务文件。
该文件应该位于 src » app 文件夹中的组件文件中。 我们导航到该文件并放入这些代码:
代码片段- auto.service.ts:
import { HttpClient } from '@angular/common/http';
import { Injectable } from '@angular/core';

@Injectable({
  providedIn: 'root',
})
export class AutoService {
  private baseURL = 'https://jsonplaceholder.typicode.com/users';

  constructor(private http: HttpClient) { }

  getData() {
    return this.http.get(this.baseURL);
  }
}
在服务文件中,我们声明了从中获取数据的 URL,并使用 getData() 函数来获取数据。
为了使网页美观,我们可以将下面的样式添加到 app.component.ts 文件中,如下所示:
代码片段- app.component.css:
.card {
    width: 100%;
    display: inline-block;
  box-sizing: border-box;
  background: #fff;
  padding: 20px;
  margin-bottom: 30px;
  }
  .title {
      margin-top: 0px;
  }
  .purple, .blue, .red, .orange, .green {
    color: #fff;
  }
  .purple {
    background: #5133AB;
  }
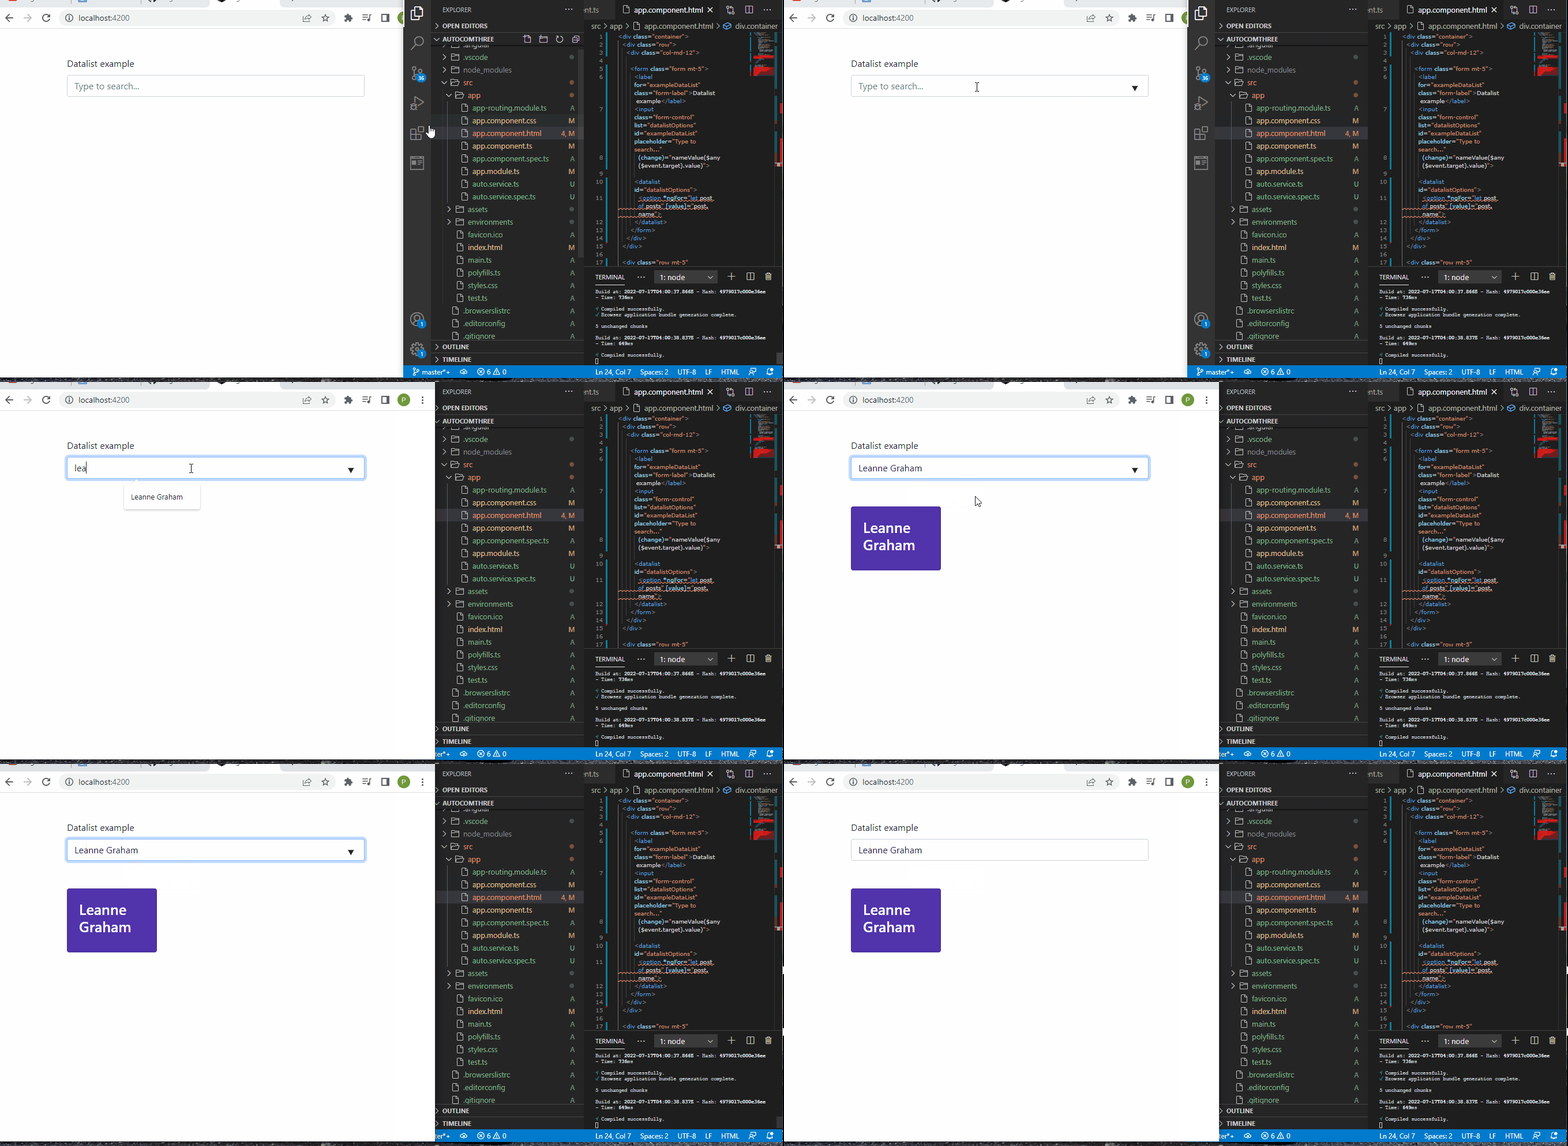
输出结果:

使用 ng-autocomplete 模块实现 AngularJS 自动完成
使用这种方法,我们将安装 Angular 自动完成模块。 创建新的项目文件夹后,我们将使用 npm install angular-ng-autocomplete 安装一个新的 Angular 模块。
然后我们前往 npmjs.com/package/angular-ng-autocomplete 并将使用示例复制到 app.component.html 文件中,如下所示:
代码片段- app.component.html:
<h1>{{title}}</h1>
<div class="ng-autocomplete">
  <ng-autocomplete
    [data]="data"
    [searchKeyword]="keyword"
    (selected)='selectEvent($event)'
    (inputChanged)='onChangeSearch($event)'
    (inputFocused)='onFocused($event)'
    [itemTemplate]="itemTemplate"
    [notFoundTemplate]="notFoundTemplate">
  </ng-autocomplete>
  <ng-template #itemTemplate let-item>
  <a [innerHTML]="item.name"></a>
  </ng-template>
  <ng-template #notFoundTemplate let-notFound>
  <div [innerHTML]="notFound"></div>
  </ng-template>
  </div>
然后在 app.component.ts 文件中,我们将以数组的形式创建我们想要在自动完成网络应用程序中使用的名称列表,如下所示:
代码片段- app.component.ts:
import { Component } from '@angular/core';

@Component({
  selector: 'app-root',
  templateUrl: './app.component.html',
  styles: [
    '.ng-autocomplete {position: fixed; /* or absolute */ top: 50%; left: 20%;}'
  ]
})
export class AppComponent {
  title = 'Angular Autocomplete';
  keyword = 'name';
  data = [
     {
       id: 1,
       name: 'Usa'
     },
     {
       id: 2,
       name: 'England'
     },
     {
       id: 3,
       name: 'India'
     },
     {
       id: 4,
       name: 'africa'
     },
     {
       id: 5,
       name: 'nigeria'
     },
     {
       id: 6,
       name: 'albania'
     },
     {
       id: 7,
       name: 'madagascar'
     }
  ];
  selectEvent(item: any) {
    console.log('selected item '+item.name);
  }
  onChangeSearch(val: string) {
    console.log('selected val '+val);
  }
  onFocused(e: any){
  }
}
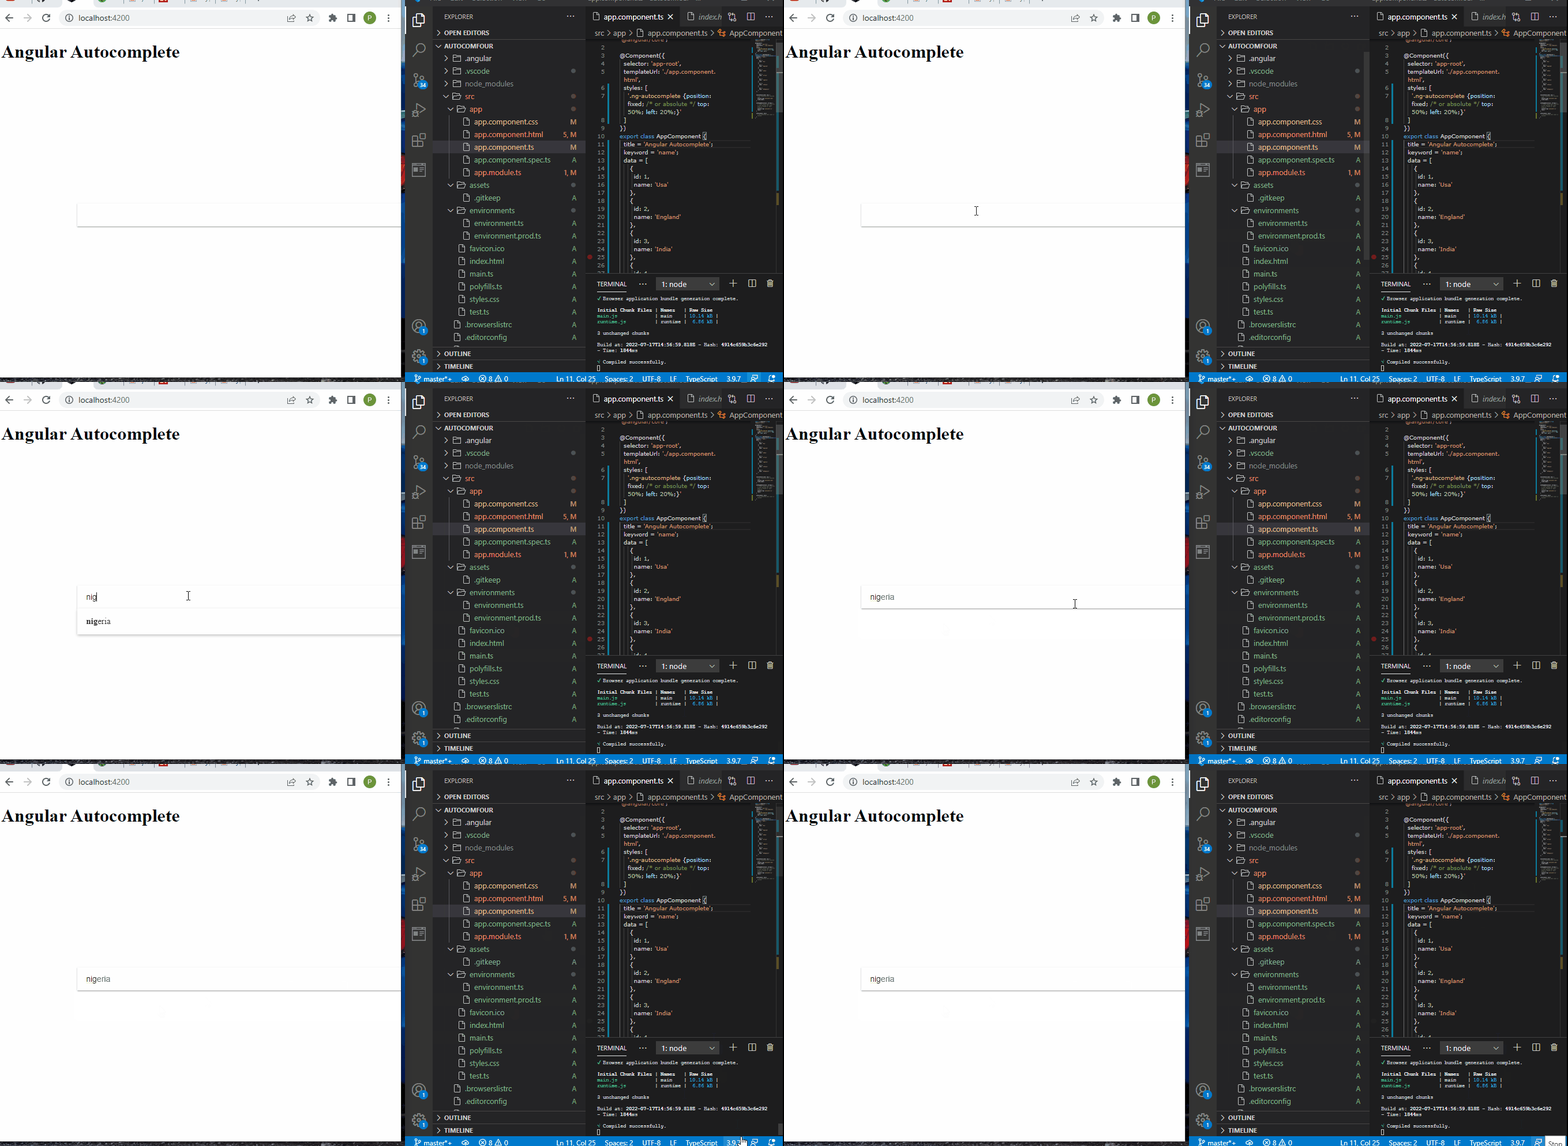
一旦我们单击搜索栏,onFocused 事件处理程序就会激活,然后 selectEvent 函数会显示我们从列表中选择的项目。
然后在 app.module.ts 中,我们导入我们之前安装的模块,如下所示:
代码片段- app.module.ts:
import { NgModule } from '@angular/core';
import { BrowserModule } from '@angular/platform-browser';
import { AppComponent } from './app.component';
import {AutocompleteLibModule} from 'angular-ng-autocomplete';

@NgModule({
  declarations: [
    AppComponent
  ],
  imports: [
    BrowserModule,
    AutocompleteLibModule
  ],
  providers: [],
  bootstrap: [AppComponent]
})
export class AppModule { }
输出结果:

使用 Angular Material 实现 AngularJS 自动完成
Angular 材料为我们提供了现成的 Web 应用程序 Angular 组件,在这个例子中,我们将使用自动完成模块。
创建新项目文件夹后,我们导航到项目文件夹并使用 ng add @angular/material 安装 Angular 材料。 然后我们访问 material.angular.io,点击Get Started,Components,选择Autocomplete。
在示例选项卡中,我们使用状态选项卡,因此我们将 HTML 代码片段复制到我们的 app.component.html,如下所示:
代码片段- app.component.html:
<form [formGroup]="stateForm">
  <mat-form-field appearance="fill">
    <mat-label>States Group</mat-label>
    <input type="text"
           matInput
           formControlName="stateGroup"
           required
           [matAutocomplete]="autoGroup">
      <mat-autocomplete #autoGroup="matAutocomplete">
        <mat-optgroup *ngFor="let group of stateGroupOptions | async" [label]="group.letter">
          <mat-option *ngFor="let name of group.names" [value]="name">
            {{name}}
          </mat-option>
      </mat-optgroup>
    </mat-autocomplete>
  </mat-form-field>
</form>
这使得我们的页面结构,准确地说,是国家搜索栏。
然后在 app.module.ts 中,我们导入自动完成组件的模块,将状态列表的表单字段作为输入模块。 该文件将如下所示:
代码片段- app.module.ts:
import { NgModule } from '@angular/core';
import { BrowserModule } from '@angular/platform-browser';
import { AppRoutingModule } from './app-routing.module';
import { AppComponent } from './app.component';
import { MatAutocompleteModule } from '@angular/material/autocomplete';
import { BrowserAnimationsModule } from '@angular/platform-browser/animations';
import { MatInputModule } from '@angular/material/input';
import { MatFormFieldModule } from '@angular/material/form-field';
import { ReactiveFormsModule } from '@angular/forms';

@NgModule({
  declarations: [
    AppComponent
  ],
  imports: [
    BrowserModule,
    AppRoutingModule,
    MatAutocompleteModule,
    BrowserAnimationsModule,
    MatInputModule,
    MatFormFieldModule,
    ReactiveFormsModule
  ],
  providers: [],
  bootstrap: [AppComponent]
})
export class AppModule { }
app.component.ts 文件将保存我们应用程序的主要代码。 不过,在 Angular 网站上,我们复制了 States 示例的 TS 代码片段,并将它们放在 AppComponent 的导出类中。
在此之前,我们复制 TS 代码片段的第一部分,导出接口 StateGroup,就在导入之后。 app.component.ts 文件应该有代码,如下所示:
代码片段- app.component.ts:
import { Component, OnInit } from '@angular/core';
import { FormControl } from '@angular/forms';
import { Observable } from 'rxjs';
import { map, startWith } from 'rxjs/operators';
import {FormBuilder} from '@angular/forms';

export interface StateGroup {
  letter: string;
  names: string[];
}
export const _filter = (opt: string[], value: string): string[] => {
  const filterValue = value.toLowerCase();

  return opt.filter(item => item.toLowerCase().includes(filterValue));
};

@Component({
  selector: 'app-root',
  templateUrl: './app.component.html',
  styleUrls: ['./app.component.css']
})
export class AppComponent implements OnInit {
  title = 'autocomnine';
  stateForm = this._formBuilder.group({
    stateGroup: '',
  });

  stateGroups: StateGroup[] = [
    {
      letter: 'A',
      names: ['Alabama', 'Alaska', 'Arizona', 'Arkansas'],
    },
    {
      letter: 'C',
      names: ['California', 'Colorado', 'Connecticut'],
    },
    {
      letter: 'D',
      names: ['Delaware'],
    },
    {
      letter: 'F',
      names: ['Florida'],
    },
    {
      letter: 'G',
      names: ['Georgia'],
    },
    {
      letter: 'H',
      names: ['Hawaii'],
    },
    {
      letter: 'I',
      names: ['Idaho', 'Illinois', 'Indiana', 'Iowa'],
    },
    {
      letter: 'K',
      names: ['Kansas', 'Kentucky'],
    },
    {
      letter: 'L',
      names: ['Louisiana'],
    },
    {
      letter: 'M',
      names: [
        'Maine',
        'Maryland',
        'Massachusetts',
        'Michigan',
        'Minnesota',
        'Mississippi',
        'Missouri',
        'Montana',
      ],
    },
    {
      letter: 'N',
      names: [
        'Nebraska',
        'Nevada',
        'New Hampshire',
        'New Jersey',
        'New Mexico',
        'New York',
        'North Carolina',
        'North Dakota',
      ],
    },
    {
      letter: 'O',
      names: ['Ohio', 'Oklahoma', 'Oregon'],
    },
    {
      letter: 'P',
      names: ['Pennsylvania'],
    },
    {
      letter: 'R',
      names: ['Rhode Island'],
    },
    {
      letter: 'S',
      names: ['South Carolina', 'South Dakota'],
    },
    {
      letter: 'T',
      names: ['Tennessee', 'Texas'],
    },
    {
      letter: 'U',
      names: ['Utah'],
    },
    {
      letter: 'V',
      names: ['Vermont', 'Virginia'],
    },
    {
      letter: 'W',
      names: ['Washington', 'West Virginia', 'Wisconsin', 'Wyoming'],
    },
  ];
  stateGroupOptions: Observable<StateGroup[]>;
  constructor(private _formBuilder: FormBuilder) {}

  ngOnInit() {
    this.stateGroupOptions = this.stateForm.get('stateGroup')!.valueChanges.pipe(
      startWith(''),
      map(value => this._filterGroup(value || '')),
    );
  }
  private _filterGroup(value: string): StateGroup[] {
    if (value) {
      return this.stateGroups
        .map(group => ({letter: group.letter, names: _filter(group.names, value)}))
        .filter(group => group.names.length > 0);
    }
    return this.stateGroups;
  }
}
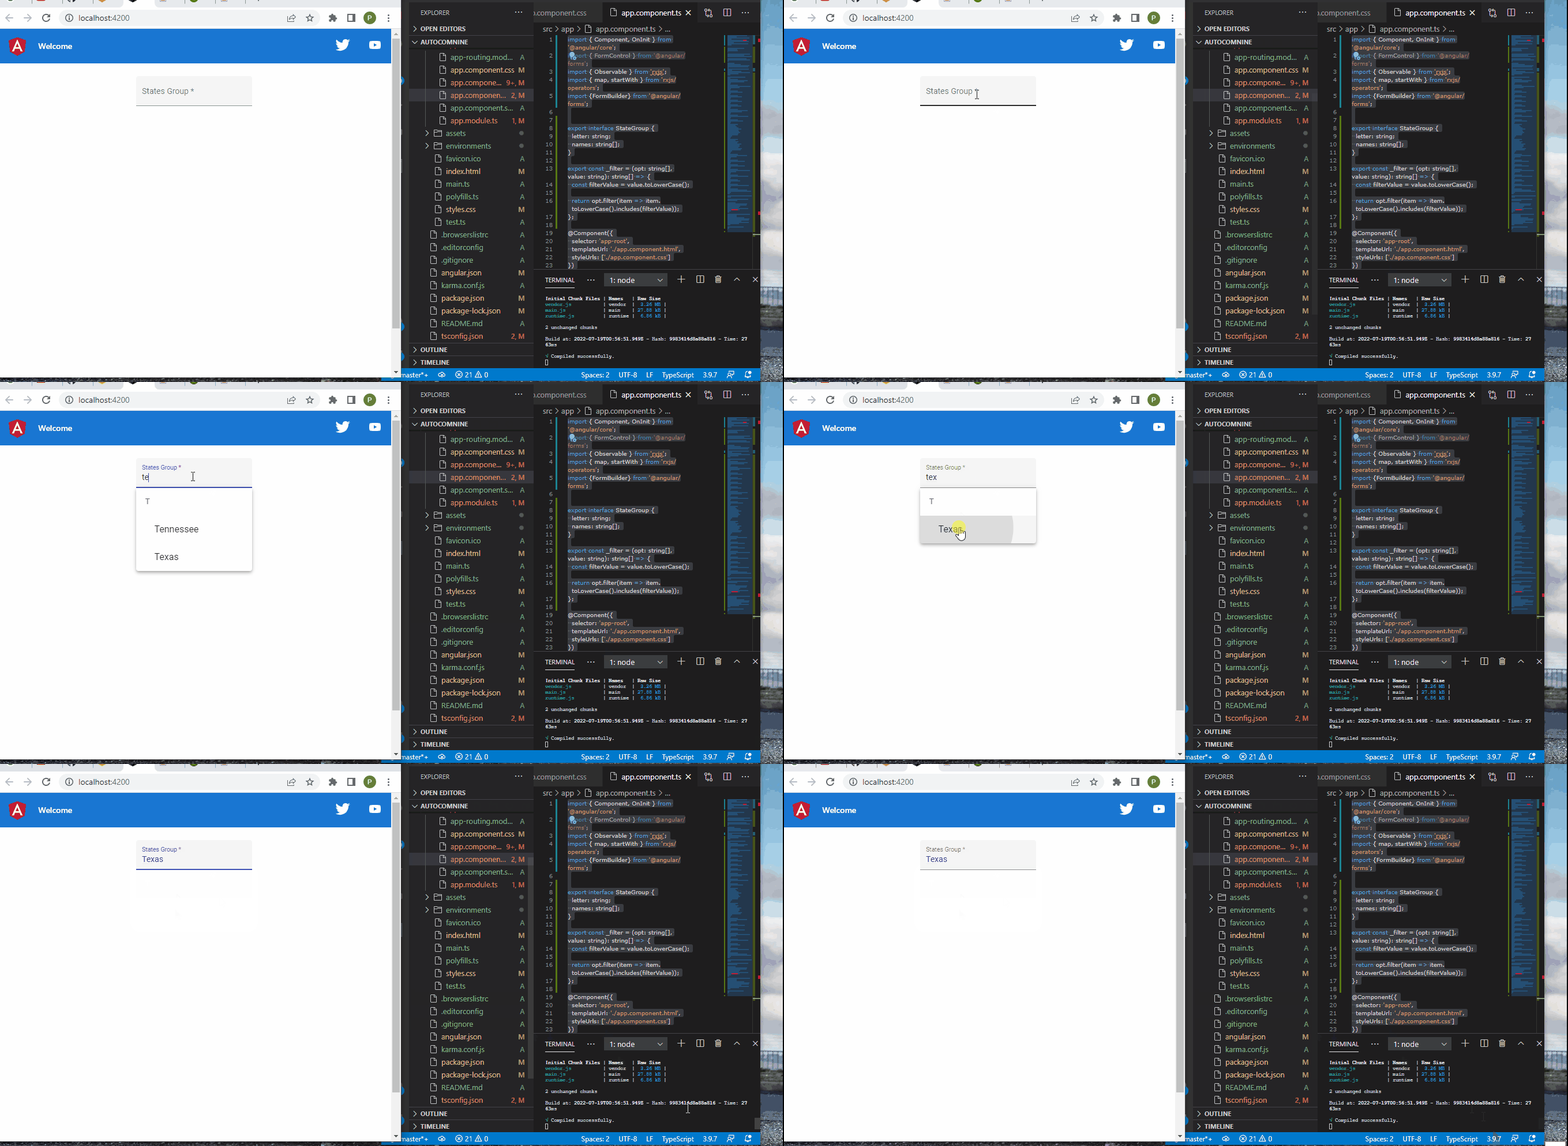
输出结果如下:

在这里,我们列出了州的名称,然后一旦我们将注意力集中在搜索栏上,我们就使用 ngOnInit() 使列表活跃起来。 然后,_filterGroup 函数会根据我们在搜索栏中输入的每个字母建议最近的州。
总结
我们可以使用我们讨论过的方法以不同方式应用自动完成功能。 此外,我们可以在很多情况下应用自动完成功能,尤其是在处理大数据时。
相关文章
Do you understand JavaScript closures?
发布时间:2025/02/21 浏览次数:108 分类:JavaScript
-
The function of a closure can be inferred from its name, suggesting that it is related to the concept of scope. A closure itself is a core concept in JavaScript, and being a core concept, it is naturally also a difficult one.
Do you know about the hidden traps in variables in JavaScript?
发布时间:2025/02/21 浏览次数:178 分类:JavaScript
-
Whether you're just starting to learn JavaScript or have been using it for a long time, I believe you'll encounter some traps related to JavaScript variable scope. The goal is to identify these traps before you fall into them, in order to av
How much do you know about the Prototype Chain?
发布时间:2025/02/21 浏览次数:150 分类:JavaScript
-
The prototype chain can be considered one of the core features of JavaScript, and certainly one of its more challenging aspects. If you've learned other object-oriented programming languages, you may find it somewhat confusing when you start
用 jQuery 检查复选框是否被选中
发布时间:2024/03/24 浏览次数:102 分类:JavaScript
-
在本教程中学习 jQuery 检查复选框是否被选中的所有很酷的方法。我们展示了使用直接 DOM 操作、提取 JavaScript 属性的 jQuery 方法以及使用 jQuery 选择器的不同方法。你还将找到许多有用的
jQuery 中的 Window.onload 与 $(document).ready
发布时间:2024/03/24 浏览次数:180 分类:JavaScript
-
本教程演示了如何在 jQuery 中使用 Window.onload 和 $(document).ready 事件。

