Java中的循环缓冲区
本文介绍如何使用数组和链表在 Java 中生成循环缓冲区。
Java中的循环缓冲区
循环缓冲区称为数组,用作队列。 当我们不断地将数据从一个进程移动到另一个进程时,我们无法将该数据存储在永久内存位置,因为它们需要时间来检索它。
因此,我们需要将此类数据存储在称为缓冲区的临时位置,例如 RAM。 循环缓冲区,也称为环形缓冲区,是一种允许以连续方式使用内存的队列。
循环缓冲区以先进先出的方式工作,可以使用数组或链表来实现。 那么让我们开始学习数组吧。
Java中使用数组创建循环缓冲区
要使用数组创建循环缓冲区,我们需要在构造函数中初始化一个空数组,其中添加到数组的元素类型未知。
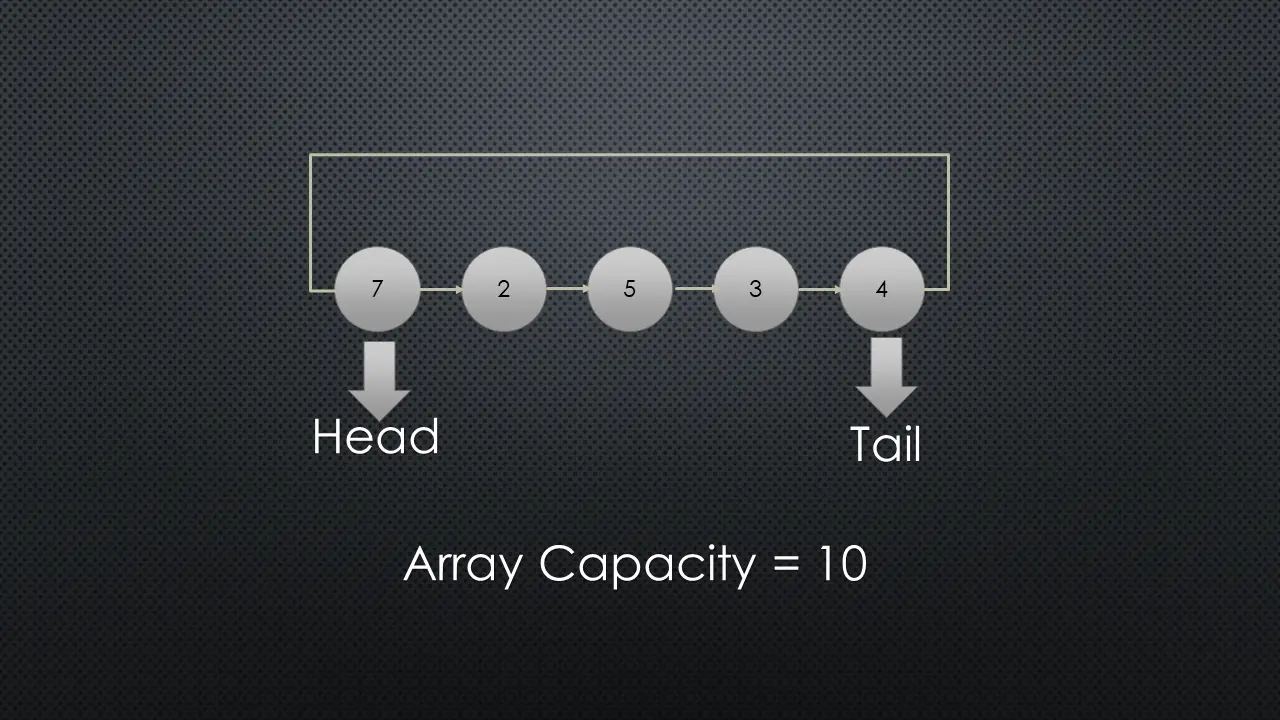
head和tail两个指针用于插入和删除操作,其中head是第一个元素,tail是最后一个元素,如图:

现在主要有两个操作,in和out表示插入和删除:
插入操作很简单,有几个要点:
- 开始时,数组大小为0,其中头位置为0,尾位置为-1。
-
然后,我们对要插入元素的索引使用以下公式:
int index_position = (tail_pointer + 1) % buffer_capacity array[index_position] = element; - 当我们向数组中插入一个元素时,数组的大小和尾指针都会加1。
- 当数组大小等于其容量时,我们就不能再添加元素了。
- 当在头指针处检索元素时,头指针将增加 1,缓冲区大小将减少 1。
-
以下公式用于我们将删除元素的索引。
int index_position = head_pointer % buffer_capacity;
Elem element = (Elem) array[index_position];
将使用循环缓冲区按顺序打印元素:[7, 2, 5, 3, 4]
我们尝试用Java实现上述循环缓冲区的方法: ```java package jiyik;7 2 5 3 4
import java.io.; import java.lang.;
class Circular_Buffer {
//the initial capacity of the buffer
private int buffer_capacity = 0;
// the initial size of the buffer
private int buffer_size = 0;
// the head pointer
private int head_pointer = 0;
// the tail pointer
private int tail_pointer = -1;
// the array
private Object[] demo_array;
Circular_Buffer(int array_capacity) {
// initialize the array capacity in the constructor
this.buffer_capacity = array_capacity;
// initialize the array
demo_array = new Object[array_capacity];
}
// insertion
public void Insert(Object array_element) throws Exception {
// calculate the index to insert the element
int index = (tail_pointer + 1) % buffer_capacity;
// increment in the size of the array
buffer_size++;
if (buffer_size == buffer_capacity) {
throw new Exception("Buffer is Overflowen");
}
// store the element in the array
demo_array[index] = array_element;
// increment the tail pointer
tail_pointer++;
}
// deletion
public Object Delete() throws Exception {
// check if the array is empty
if (buffer_size == 0) {
throw new Exception("Buffer is empty");
}
// calculate the index of the element which is going to be deleted
int element_index = head_pointer % buffer_capacity;
// get the element
Object array_element = demo_array[element_index];
// increment the head pointer
head_pointer++;
// decrement the size of the array
buffer_size--;
// return the first element
return array_element;
}
// retrieve the first element
public Object Retrieve() throws Exception {
// check if the array is empty
if (buffer_size == 0) {
throw new Exception("Buffer is empty");
}
// calculate the index of the element to be deleted
int element_index = head_pointer % buffer_capacity;
Object array_element = demo_array[element_index];
return array_element;
}
// helper methods
public boolean isEmpty() { return buffer_size == 0; }
public int size() { return buffer_size; }
}
public class Example { public static void main(String[] args) throws Exception {
// create the Circular Buffer using an array
Circular_Buffer Array_CircularBuffer = new Circular_Buffer(10);
// insert elements into the circular buffer
Array_CircularBuffer.Insert(7);
Array_CircularBuffer.Insert(2);
Array_CircularBuffer.Insert(5);
Array_CircularBuffer.Insert(3);
Array_CircularBuffer.Insert(4);
// print the elements with the delete method
System.out.println("The elements were inserted and "
+ "now printed in the order by deletion:-");
System.out.println(Array_CircularBuffer.Delete());
System.out.println(Array_CircularBuffer.Delete());
System.out.println(Array_CircularBuffer.Delete());
System.out.println(Array_CircularBuffer.Delete());
System.out.println(Array_CircularBuffer.Delete());
}
}
上面的代码包含两个类,一个用于方法,另一个用于运行操作的主类。
第一类包括元素的插入、删除和检索方法; 代码通过循环缓冲区的插入和删除操作,将元素一一打印出来; 查看输出:
```bash
The elements were inserted and now printed in the order by deletion:-
7
2
5
3
4
Java中使用链表创建循环缓冲区
要在 Java 中使用链表创建循环缓冲区,我们需要创建一个辅助类,用于创建通用节点。 和数组类似,我们会维护头和尾,以便插入和删除; 流程如图所示:
使用链表插入创建循环缓冲区的步骤是:
- 开始时,大小为0,头部和尾部为空。
- 然后,将元素添加到链表的尾部。
- 然后将尾部的引用更改为头指针。
- 当元素添加到链表中时,缓冲区大小也会增加。
- 当数组大小等于其容量时,我们就不能再添加元素了。
删除的步骤是:
- 首先,我们将检索头指针处的元素。
- 其次,我们将头指针的引用更改为下一个元素。
-
缓冲区的大小将减 1。
现在,例如,使用链表的循环缓冲区的输入数组是:
将使用带有链表的循环缓冲区按顺序打印元素:[7, 2, 5, 3, 4]
让我们尝试在Java代码中使用链表来实现循环缓冲区: ```java package jiyik;7 2 5 3 4
class Node
// the constructor will initialize the data in each node
Node(Elem Node_data) { this.Node_Data = Node_data; }
}
class LinkedList_CircularBuffer
// the head node
Node<Elem> head_element;
// the tail node
Node<Elem> tail_element;
int list_size = 0;
int list_capacity = 0;
// the constructor for circular buffer class
LinkedList_CircularBuffer(int list_capacity) {
this.list_capacity = list_capacity;
}
// insertion
public void Insert(Elem element) throws Exception {
// increment in the size when elements
// are added to the linked list
list_size++;
// check the buffer
if (list_size == list_capacity) {
throw new Exception("Buffer is Overflowen");
}
if (head_element == null) {
head_element = new Node<>(element);
tail_element = head_element;
return;
}
// The node element which will be linked
Node<Elem> temp_element = new Node<>(element);
// reference the last element to the head node
temp_element.next_pointer = head_element;
// update the tail reference to the latest node.
tail_element.next_pointer = temp_element;
// update the tail to the latest node, which is added now
tail_element = temp_element;
}
// deletion
public Elem Delete() throws Exception {
// check the buffer
if (list_size == 0) {
throw new Exception("The Buffer is empty");
}
// get the element
Elem element = head_element.Node_Data;
// update the head pointer
head_element = head_element.next_pointer;
// update the tail reference to the head pointer
tail_element.next_pointer = head_element;
// decrement in the size
list_size--;
if (list_size == 0) {
// remove any references present when the buffer is null
head_element = tail_element = null;
}
return element;
}
// retrieve the head element without deleting it
public Elem Retrieve() throws Exception {
// check the buffer
if (list_size == 0) {
throw new Exception("Empty Buffer");
}
// get the element
Elem element = head_element.Node_Data;
return element;
}
// helper methods
public boolean isEmpty() { return list_size == 0; }
public int size() { return list_size; }
}
public class Example { public static void main(String[] args) throws Exception {
// create the Circular Buffer using Linked List
LinkedList_CircularBuffer<Integer> LL_CircularBuffer = new
LinkedList_CircularBuffer<>(10);
// insert elements to the circular Buffer
LL_CircularBuffer.Insert(7);
LL_CircularBuffer.Insert(2);
LL_CircularBuffer.Insert(5);
LL_CircularBuffer.Insert(3);
LL_CircularBuffer.Insert(4);
// printing the elements with the method delete
System.out.println("The elements were inserted and "
+ "now printed in the order by deletion:-");
System.out.println(LL_CircularBuffer.Delete());
System.out.println(LL_CircularBuffer.Delete());
System.out.println(LL_CircularBuffer.Delete());
System.out.println(LL_CircularBuffer.Delete());
System.out.println(LL_CircularBuffer.Delete());
}
}
上面的代码创建了一个通用节点类来执行链表操作,并创建了方法来执行插入、删除和检索操作。
该代码将使用链表创建一个循环缓冲区,并逐一打印输入列表元素,请参见下面的输出:
```bash
The elements were inserted and now printed in the order by deletion:-
7
2
5
3
4
相关文章
如何在 Java 中延迟几秒钟的时间
发布时间:2023/12/17 浏览次数:217 分类:Java
-
本篇文章主要介绍如何在 Java 中制造程序延迟。本教程介绍了如何在 Java 中制造程序延时,并列举了一些示例代码来了解它。
如何在 Java 中把 Hashmap 转换为 JSON 对象
发布时间:2023/12/17 浏览次数:187 分类:Java
-
它描述了允许我们将哈希图转换为简单的 JSON 对象的方法。本文介绍了在 Java 中把 Hashmap 转换为 JSON 对象的方法。我们将看到关于创建一个 hashmap,然后将其转换为 JSON 对象的详细例子。
如何在 Java 中按值排序 Map
发布时间:2023/12/17 浏览次数:171 分类:Java
-
本文介绍了如何在 Java 中按值对 Map 进行排序。本教程介绍了如何在 Java 中按值对 Map
如何在 Java 中打印 HashMap
发布时间:2023/12/17 浏览次数:192 分类:Java
-
本帖介绍了如何在 Java 中打印 HashMap。本教程介绍了如何在 Java 中打印 HashMap 元素,还列举了一些示例代码来理解这个主题。
在 Java 中更新 Hashmap 的值
发布时间:2023/12/17 浏览次数:146 分类:Java
-
本文介绍了如何在 Java 中更新 HashMap 中的一个值。本文介绍了如何在 Java 中使用 HashMap 类中包含的两个方法-put() 和 replace() 更新 HashMap 中的值。
Java 中的 hashmap 和 map 之间的区别
发布时间:2023/12/17 浏览次数:79 分类:Java
-
本文介绍了 Java 中的 hashmap 和 map 接口之间的区别。本教程介绍了 Java 中 Map 和 HashMap 之间的主要区别。在 Java 中,Map 是用于以键值对存储数据的接口,
在 Java 中获取用户主目录
发布时间:2023/12/17 浏览次数:218 分类:Java
-
这篇文章向你展示了如何在 Java 中获取用户主目录。本教程介绍了如何在 Java 中获取用户主目录,并列出了一些示例代码以指导你完成该主题。
Java 中 size 和 length 的区别
发布时间:2023/12/17 浏览次数:179 分类:Java
-
这篇文章教你如何知道 Java 中大小和长度之间的区别。本教程介绍了 Java 中大小和长度之间的区别。我们还列出了一些示例代码以帮助你理解该主题。
Java 中的互斥锁
发布时间:2023/12/17 浏览次数:111 分类:Java
-
了解有关 Java 中互斥锁的一切,在计算机科学领域,互斥或互斥被称为并发控制的属性。每台计算机都使用称为线程的最小程序指令序列。有一次,计算机在一个线程上工作。为了更好地理解,

