How to use Docker to image a Node.js web application
Docker is a containerization platform that simplifies the packaging and execution of applications. Containers run as independent processes with their own file systems, but share the kernel of their host machine. Docker has attracted much attention as a way to achieve reproducible development environments and distributed deployment architectures.
Node.js is the leading JavaScript runtime for backend development. Successfully launching a Node.js web service requires that we have an environment with Node installed, application code available, and a mechanism to handle automatic restarts in case of crashes.
In this article, we will use Docker to containerize a simple Node.js application created using the popular Express web framework. Docker is a great way to deploy Node-based systems because it creates a consistent environment that includes everything you need to run your service. The Docker daemon has integrated support for restarting failed containers when their foreground process crashes, solving a problem for Node.js deployments.
Creating a Node Project
We'll skip the details of implementing the application. Create a directory for the project and add some server code in it. Here's a basic app.js that listens on port 8080 and responds to each request with a hardcoded response:
const express = require("express");

const app = express();
app.get("*", (req, res) => res.send("<p>Hello 迹忆客!</p>"));
app.listen(8080, () => console.log("Listening on 8080"));
Add Express to your project using npm:
$ npm init
$ npm install --save express
Start the application to see it work:
$ node app.js
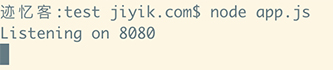
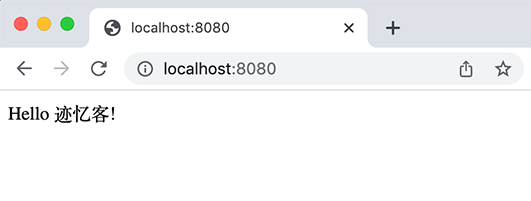
We should be able to see the effect by visiting localhost:8080 in our browser.
Writing a Dockerfile
Now it's time to package our project. First, we need an image for our application. An image encapsulates our code and dependencies into a single package that is used to start a container instance. The instructions in the Dockerfile define the state of the container's initial file system.
Here is the Dockerfile for the sample application:
FROM node:16
WORKDIR /app

COPY package.json .
COPY package-lock.json .
RUN npm ci

COPY app.js .
CMD ["app.js"]
This Dockerfile selects the official Node.js Docker image as its base via the FROM statement. The image inherits everything from the base and then adds additional content via the following instructions.
The WORKDIR line sets the working directory to /app. The COPY statement places the file in the /app directory within the container image.
Install Dependencies
The next stage is to add npm's package.json and run npm ci. This will install the project's npm dependencies (in this case Express) in the container's file system.
Do not use COPY node_modules/ .copy an existing node_modules folder in the project directory - this will prevent us from reusing the Dockerfile in other build environments. Dockerfiles should allow us to create consistent builds using only the contents of our source control repository. If we have a file or folder in our .gitignore, we should not reference it in the Dockerfile COPY directive.
Copy the application code
npm ciAfter running, our application code is copied into the image. Placing this COPY instruction after RUN to separate it from the previous copy is deliberate. Each instruction creates a new image in the image; Docker's build process caches each layer to speed up subsequent builds. Once the content of a layer changes, the cache of all subsequent layers is invalidated.
That’s why you should copy your application code after doing npm ci . Code will usually change more frequently than the contents of the npm lock file. An image rebuild involving only code changes will effectively skip the RUN npm ci stage (and all earlier stages), which will significantly speed up the process when we have a lot of dependencies.
Command to set up mirroring
The final Dockerfile stage uses the CMD instruction to automatically run our application when the container starts. This is because the Node.js base image is configured to use the node process as its entry point. CMD is appended to the inherited entry point, causing node app.js to run as the foreground process of the new image.
Create an image
Next, we need to build the image:
$ docker build -t node-app:latest .
Docker will get the Dockerfile in the working directory, run the instructions in it, and tag the resulting image as node-app:latest. Finally, our working directory is specified as the image build context. This determines the path that the COPY instruction in the Dockerfile can reference.
Build optimization
One way to improve build performance is to add a .dockerignore file to the root of your project. Add the following to the file:
node_modules/
This file defines paths in the working directory that will not be included in the build context. Therefore we will not be able to reference them in the Dockerfile. In the case of node_modules, the contents of this directory are not relevant to the build because we are reinstalling the dependencies via the RUN npm ci instruction. Specifically excluding node_modules that already exist in the working directory saves the operation of copying all of these files to Docker's temporary build context location. This increases efficiency and reduces the time spent preparing the build.
Start the container
At this point we are ready to run our application using Docker:
$ docker run -d \
    -p 8080:8080 \
    --name my-app \
    --restart on-failure \
    node-app:latest
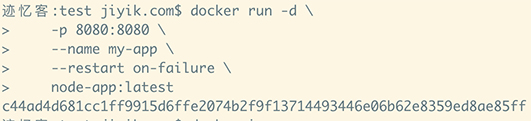
docker runThe command is used to start a new container instance from the specified image. Some additional flags are added to properly configure the container for the intended use case:
- -d – detaches the shell from the container's foreground process, effectively running it as a background server.
- -p - Binds port 8080 on the host to port 8080 inside the container (our Express sample app is configured to listen on 8080). This means that traffic to localhost:8080 will be passed to the corresponding container port. The host can be changed to a different value by modifying the first part of the binding definition, such as 8100:8080 to access the container at localhost:8100.
- --name – Assigns a name to the container, which you can use to reference it in other Docker CLI commands.
- --restart – Select the restart policy to apply to the container. The on-failure setting means that Docker will automatically restart the container if it exits with a failure code due to an application crash.
The image built in the previous step is used as the last argument to the docker run command. The container ID will be sent to the terminal window; we should be able to access the Node.js application by visiting localhost:8080 again. This time the server is running inside a Docker container instead of using the node process installed on the host.
Summarize
Docker helps us deploy Node.js web services by containerizing the entire application environment. We can start a container from an image using a single docker run command on any host with Docker installed. This eliminates the complexity of maintaining Node.js versions, installing npm modules, and monitoring situations where the application process needs to be restarted.
When we make code changes and want to launch an update, we need to rebuild the Docker image and docker rm <container-name>remove the old container using . We can then launch a replacement instance that uses the modified image.
We might want to use a slightly different routine in production. While it is possible to use a regular Docker installation with docker run , this tends to be unwieldy for all but the simplest applications. It is more common to use a tool like Docker Compose or Kubernetes to define container configurations in files that can be versioned in a repository.
These mechanisms eliminate the need to repeat the docker run command every time you start a new container. They also facilitate container replication to scale services and provide redundancy. If you are deploying to a remote host, you will also need to push the image to a Docker registry so that you can "pull" it from your production machine.
Another production-specific consideration is how to route traffic to containers. Port binding is sufficient at first, but eventually you'll run into a situation where you want to have multiple containers on a single host, each listening on the same port. In this case, we can deploy a reverse proxy to route traffic to individual container ports based on request characteristics, such as domain names and headers.
For reprinting, please send an email to 1244347461@qq.com for approval. After obtaining the author's consent, kindly include the source as a link.
Related Articles
Get the IP address of the Docker container from the host using docker inspect
Publish Date:2025/03/26 Views:103 Category:Docker
-
Docker containers are not just for isolation—they are often used to manage processes that still need to communicate directly with each other. However, to communicate, you usually need to know the IP address of each container, which you ca
Solution to incorrect access log time when deploying Nginx in Docker
Publish Date:2025/03/26 Views:165 Category:Docker
-
In the process of operating the website, I never took the logs too seriously. Although logging was turned on, I never analyzed the logs carefully. Today, when I looked at the logs on a whim, I found that the recorded time was 8 hours less t
Docker deploys nginx php application
Publish Date:2025/03/26 Views:131 Category:Docker
-
I'm learning docker recently. I'm learning by building an nginx+php development environment example. Here I record the build process. First, give a docker-compose.yml deployment configuration file version: '3' services: nginx: container_nam
Start a Bash terminal in a new Docker container
Publish Date:2025/03/26 Views:97 Category:Docker
-
Docker containers are a standard unit for packaging all the dependencies of an application, allowing us to easily run them in any environment. Containers have become very popular recently, and most developers now rely heavily on containers
Passing environment variables to containers in Docker
Publish Date:2025/03/26 Views:125 Category:Docker
-
This article will introduce how to pass environment variables to containers in Docker. Passing environment variables to containers in Docker using the -e and tags -env We will first see how to create environment variables and pass them to t
Install Docker using Homebrew
Publish Date:2025/03/26 Views:202 Category:Docker
-
There is no doubt that Docker containers have revolutionized the way we develop and deploy applications. They provide developers with the ability to package applications and dependencies in an isolated environment. Recently, we've seen wide
Enforce clean build of images in Docker
Publish Date:2025/03/26 Views:88 Category:Docker
-
This article discusses and demonstrates how to enforce clean builds of images in Docker. Building images in Docker We will use a simple Flask application to demonstrate this concept. my-app Create a app.py simple application named in the ho
Running a Docker instance from a Dockerfile
Publish Date:2025/03/26 Views:140 Category:Docker
-
Docker containers have undoubtedly become the standard unit for managing software and dependencies in different environments. When using real applications, you must create a docker file before building the container image of the application
Copy files from host to Docker container
Publish Date:2025/03/25 Views:127 Category:Docker
-
This article will discuss and demonstrate methods we can use to transfer files from the host to a running container in Docker. docker cp Copy the file from the host to the Docker container using docker cp The command is one of the simplest

