在 Angular 中查看子组件
@ViewChild 是 Angular 中最常用的装饰器。它是我们在学习 Angular 时遇到的第一个装饰器之一。
@ViewChild 具有本教程中讨论的许多功能,每个用例都有实际示例。
@ViewChild 是一个配置视图查询的属性装饰器。如果视图 DOM 发生更改并且新的子项与选择器匹配,则更新该属性。
我们可以将@ViewChild 与指令、DOM 元素和子组件一起使用。我们可以在示例中了解如何使用@ViewChild。
让我们使用以下命令创建一个新应用程序。
# angular
ng new my-app
在 Angular 中创建我们的新应用程序后,我们将使用此命令转到我们的应用程序目录。
# angular
cd my-app
现在,让我们运行我们的应用程序来检查所有依赖项是否安装正确。
# angular
ng serve --open
让我们创建一个指令 LanguageDirective。该指令将查找具有属性 appLanguage 的元素,并在元素中添加单词 Language 的文本。
有两种方法可以使用 @angular/cli 生成指令或创建文件 language.directive.ts。
# Angular
ng generate directive language --skip-tests
该命令将创建一个 language.directive.ts 文件并将指令添加到 app.module.ts 文件中。我们将使用 ElementRef 和 Renderer2 来重写文本。
因此,我们在 language.directive.ts 中的代码将如下所示。
# angular
import {
  Directive,
  ElementRef,
  Renderer2
} from '@angular/core';

@Directive(
  { selector: '[appLanguage]' }
)
export class LanguageDirective {
  language = 'NodeJs';

  constructor(elem: ElementRef, renderer: Renderer2) {
    let language = renderer.createText('Language ');
    renderer.appendChild(elem.nativeElement, language);
  }
}
app.module.ts 中的代码如下所示。
# Angular
import { NgModule } from '@angular/core';
import { BrowserModule } from '@angular/platform-browser';
import { FormsModule } from '@angular/forms';
import { AppComponent } from './app.component';
import { HelloComponent } from './hello.component';
import { LanguageDirective } from './language.directive';

@NgModule({
  imports: [BrowserModule, FormsModule],
  declarations: [AppComponent, HelloComponent, LanguageDirective],
  bootstrap: [AppComponent],
})
export class AppModule {}
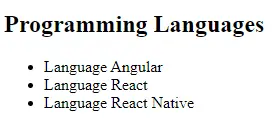
将 appLanguage 属性添加到组件模板中包含文本的 li。因此,我们在 app.component.html 中的代码将如下所示。
# Angular
<h2>Programming Languages</h2>
<ul>
  <li appLanguage>Angular</li>
  <li appLanguage>React</li>
  <li appLanguage>React Native</li>
</ul>
输出:

元素内容前的单词 Language 也可以访问 LanguageDirective 的实例变量并使用其值设置 extraLanguage 实例变量。
因此,我们在 app.component.ts 中的代码将如下所示。
# Angular
import { Component, ViewChild, AfterViewInit } from '@angular/core';
import { LanguageDirective } from './language.directive';

@Component({
  selector: 'my-app',
  templateUrl: './app.component.html',
  styleUrls: ['./app.component.css'],
})
export class AppComponent implements AfterViewInit {
  extraLanguage!: string;

  @ViewChild(LanguageDirective)
  set appLanguage(directive: LanguageDirective) {
    this.extraLanguage = directive.language;
  }

  ngAfterViewInit() {
    console.log(this.extraLanguage); // NodeJs
  }
}
我们在上面的代码中使用了一个 setter 来设置 extraLanguage 变量。
现在,你会注意到它将等待 AfterViewInit 生命周期挂钩来访问变量,因为在加载初始视图后子组件和指令变得可用。
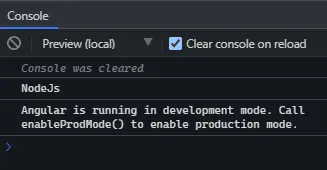
输出:

上面的输出表明父组件可以使用 @ViewChild 访问指令中的值。
在 Angular 中将 ViewChild 与 DOM 元素一起使用
在本例中,我们将遍历 DOM 元素并使用 @ViewChild 访问它们。 @ViewChild 允许我们使用模板引用变量访问本机 DOM 元素。
让我们使用以下命令创建一个新应用程序。
# angular
ng new my-app
在 Angular 中创建我们的新应用程序后,我们将使用此命令转到我们的应用程序目录。
# angular
cd my-app
现在,让我们运行我们的应用程序来检查所有依赖项是否安装正确。
# angular
ng serve --open
例如,我们在 app.component.html 中有一个输入标签,其中 #forViewChild 引用变量显示在下面的代码中。
# Angular
<input #forViewChild placeholder="Your favorite Programming Language">
我们还将在 app.component.css 中添加一些 CSS。
# Angular
p {
  font-family: Lato;
}
input {
  padding: 5px 10px;
}
label {
  font-size: 20px;
  padding-right: 10px;
}
输出:

现在,我们可以使用 @ViewChild 访问输入并设置值。app.component.ts 中的代码如下所示。
# angular
import { Component, ViewChild, AfterViewInit, ElementRef } from '@angular/core';

@Component({
  selector: 'my-app',
  templateUrl: './app.component.html',
  styleUrls: ['./app.component.css'],
})
export class AppComponent implements AfterViewInit {
  @ViewChild('forViewChild') forViewChild!: ElementRef;
  ngAfterViewInit() {
    this.forViewChild.nativeElement.value = 'Angular!';
  }
}
因此,当 ngAfterViewInit 执行时,输入值将被更改并设置为 Angular!如下例所示。
输出:

正如你在上面的示例中看到的,父组件使用 @ViewChild 设置子 DOM 元素的值。
在 Angular 中将 ViewChild 与子组件一起使用
使用@ViewChild,我们可以访问子组件并调用子组件可用的方法或实例变量。现在我们将通过一个示例来了解如何在 Angular 中将 @ViewChild 与子组件一起使用。
让我们使用以下命令创建一个新应用程序。
# angular
ng new my-app
在 Angular 中创建我们的新应用程序后,我们将使用此命令转到我们的应用程序目录。
# angular
cd my-app
现在,让我们运行我们的应用程序来检查所有依赖项是否安装正确。
# angular
ng serve --open
现在,让我们创建一个新组件作为 HelloComponent。
我们可以通过两种方式创建一个新组件。通过使用 @angular/cli 并运行以下命令。
# Angular
ng generate component hello --flat --skip-tests
使用此命令,将创建 hello.component.ts、hello.component.html 和 hello.component.css 文件。或者我们可以手动创建这些文件。
现在,在 app.module.ts 中,我们需要添加新创建的组件。app.module.ts 中的代码如下所示。
# Angular
import { NgModule } from '@angular/core';
import { BrowserModule } from '@angular/platform-browser';
import { FormsModule } from '@angular/forms';

import { AppComponent } from './app.component';
import { HelloComponent } from './hello.component';

@NgModule({
  imports:      [ BrowserModule, FormsModule ],
  declarations: [ AppComponent, HelloComponent ],
  bootstrap:    [ AppComponent ]
})
export class AppModule { }
我们将向 HelloComponent 添加 GreetingMessage 方法以返回消息。
# Angular
import { Component, OnInit } from '@angular/core';

@Component({
  selector: 'hello',
  templateUrl: './hello.component.html',
  styleUrls: ['./hello.component.css'],
})
export class HelloComponent implements OnInit {
  constructor() {}

  GreetingMessage() {
    return 'Hello Member!';
  }

  ngOnInit(): void {}
}
现在,我们将使用 <hello> 引用 app.component.html 中的子组件。因此,我们的代码将如下所示。
# Angular
<hello>It Works</hello>
我们将使用 @ViewChild 从父组件类 app.component.ts 调用 GreetingMessage 方法。因此,我们的代码将如下所示。
# Angular
import { Component, ViewChild, AfterViewInit } from '@angular/core';
import { HelloComponent } from './hello.component';

@Component({
  selector: 'my-app',
  templateUrl: './app.component.html',
  styleUrls: ['./app.component.css'],
})
export class AppComponent {
  @ViewChild(HelloComponent) hello!: HelloComponent;

  ngAfterViewInit() {
    console.log(this.hello.GreetingMessage());
  }
}
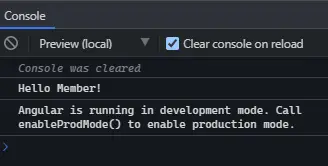
输出:

本教程通过示例教我们如何在不同情况下使用@ViewChild。
相关文章
Do you understand JavaScript closures?
发布时间:2025/02/21 浏览次数:108 分类:JavaScript
-
The function of a closure can be inferred from its name, suggesting that it is related to the concept of scope. A closure itself is a core concept in JavaScript, and being a core concept, it is naturally also a difficult one.
Do you know about the hidden traps in variables in JavaScript?
发布时间:2025/02/21 浏览次数:178 分类:JavaScript
-
Whether you're just starting to learn JavaScript or have been using it for a long time, I believe you'll encounter some traps related to JavaScript variable scope. The goal is to identify these traps before you fall into them, in order to av
How much do you know about the Prototype Chain?
发布时间:2025/02/21 浏览次数:150 分类:JavaScript
-
The prototype chain can be considered one of the core features of JavaScript, and certainly one of its more challenging aspects. If you've learned other object-oriented programming languages, you may find it somewhat confusing when you start
用 jQuery 检查复选框是否被选中
发布时间:2024/03/24 浏览次数:102 分类:JavaScript
-
在本教程中学习 jQuery 检查复选框是否被选中的所有很酷的方法。我们展示了使用直接 DOM 操作、提取 JavaScript 属性的 jQuery 方法以及使用 jQuery 选择器的不同方法。你还将找到许多有用的
jQuery 中的 Window.onload 与 $(document).ready
发布时间:2024/03/24 浏览次数:180 分类:JavaScript
-
本教程演示了如何在 jQuery 中使用 Window.onload 和 $(document).ready 事件。

