在 JavaFX 中移动对象
在本文中,我们将向左、右、上、下四个方向移动对象。 为此,我们将使用以下代码。
在 JavaFX 中移动对象
我们看一下下面的代码。 我们稍后会解释。
// Importing necessary packages.
import javafx.application.Application;
import javafx.stage.Stage;
import javafx.scene.Scene;
import javafx.scene.layout.Pane;
import javafx.scene.layout.HBox;
import javafx.scene.layout.BorderPane;
import javafx.scene.control.Button;
import javafx.scene.paint.Color;
import javafx.scene.shape.Circle;
import javafx.geometry.Insets;
import javafx.geometry.Pos;

public class MoveObject extends Application {
    @Override
    public void start(Stage primaryStage) {  //Our main method
        BallPane BallPane = new BallPane();

        HBox ButtonHolder = new HBox(5); // Create an Hbox named "ButtonHolder"
        Button LeftBtn = new Button("Left"); // Create a button that move the ball left
        Button RightBtn = new Button("Right"); // Create a button that move the ball Right
        Button UpBtn = new Button("Up"); // Create a button that move the ball Up
        Button DownBtn = new Button("Down"); // Create a button that move the ball Down
        ButtonHolder.getChildren().addAll(LeftBtn, RightBtn, UpBtn, DownBtn); // Contain all the button to the `ButtonHolder` Hbox

        // Create actions for the buttons
        LeftBtn.setOnAction(e -> BallPane.MoveLeft());
        RightBtn.setOnAction(e -> BallPane.MoveRight());
        UpBtn.setOnAction(e -> BallPane.MoveUp());
        DownBtn.setOnAction(e -> BallPane.MoveDown());

        BorderPane pane = new BorderPane();  // Create a BorderPane
        pane.setCenter(BallPane);  // Set the BallPane to pane
        pane.setBottom(ButtonHolder); // Set the ButtonHolder to pane
        pane.setPadding(new Insets(0, 20, 0, 20)); // Apply necessary paddings
        BorderPane.setAlignment(ButtonHolder, Pos.CENTER); // Align the ButtonHolder

        Scene scene = new Scene(pane, 250, 250); // Create a scene
        primaryStage.setTitle("Move a Ball"); // Provide an application title "Move a Ball"
        primaryStage.setScene(scene);  // Set the scene to stage
        primaryStage.show(); // Visualizing the stage.
    }

    public static void main(String[] args) {
        Application.launch(args);
    }
}

class BallPane extends Pane { //  Create a Pane for pane
    private double radius = 25; // Define the ball redius
    private double width = 210; // Define the ball width
    private double height = 210; // Define the ball height
    Circle Ball = new Circle(width/2, height/2, radius); // Calcuate the circle

    BallPane() { // Set ball properties
        Ball.setFill(Color.GREEN);
        Ball.setStroke(Color.BLACK);
        getChildren().add(Ball);
    }

    public void MoveLeft() { // Method for moving the ball left
        if (Ball.getRadius() < Ball.getCenterX()) {
            Ball.setCenterX(Ball.getCenterX() - 10);
        }
    }

    public void MoveRight() { // Method for moving the ball Right
        if (Ball.getCenterX() < width - Ball.getRadius()) {
            Ball.setCenterX(Ball.getCenterX() + 10);
        }
    }

    public void MoveUp() { // Method for moving the ball Up
        if (Ball.getRadius() < Ball.getCenterY()) {
            Ball.setCenterY(Ball.getCenterY() - 10);
        }
    }

    public void MoveDown() { // Method for moving the ball Down
        if (Ball.getCenterY() < height - Ball.getRadius()) {
            Ball.setCenterY(Ball.getCenterY() + 10);
        }
    }
}
我们已经注释了代码中每一行的用途。 现在,我们将讨论其背后的想法。
导入所有必需的包后,我们使用名为primaryStage的Stage创建了main方法。 我们还创建了一个 HBox,在容器中保存必要的按钮。
之后,我们为按钮创建操作。 代码的其他部分是通过命令来描述的。
现在我们讨论向左、向右、向上、向下移动对象的动作的工作过程。
public void MoveLeft() { // Method for moving the ball left
    if (Ball.getRadius() < Ball.getCenterX()) {
        Ball.setCenterX(Ball.getCenterX() - 10);
    }
}
当用户单击此按钮时,上述方法会将对象的位置更改为左侧,或者从技术上讲,更改为 -x 方向。
public void MoveRight() { // Method for moving the ball Right
    if (Ball.getCenterX() < width - Ball.getRadius()) {
        Ball.setCenterX(Ball.getCenterX() + 10);
    }
}
然后,当用户单击此按钮时,上面共享的方法会将对象的位置更改为右侧,或者从技术上讲,更改为 +x 方向。
public void MoveUp() { // Method for moving the ball Up
    if (Ball.getRadius() < Ball.getCenterY()) {
        Ball.setCenterY(Ball.getCenterY() - 10);
    }
}
之后,当用户单击此按钮时,上面共享的方法会将对象的位置更改为上侧,或者从技术上讲,更改为 +y 方向。
public void MoveDown() { // Method for moving the ball Down
    if (Ball.getCenterY() < height - Ball.getRadius()) {
        Ball.setCenterY(Ball.getCenterY() + 10);
    }
}
最后,当用户单击此按钮时,上述方法会将对象的位置更改为下侧,或者从技术上讲,更改为 -y 方向。
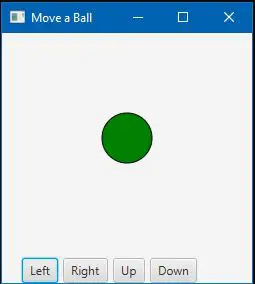
编译代码并运行后,您将得到如下所示的输出。
输出:
请记住,如果您的 IDE 不支持自动包含库。 那么编译前可能需要手动包含必要的库文件; 否则会显示错误。
相关文章
如何在 Java 中延迟几秒钟的时间
发布时间:2023/12/17 浏览次数:217 分类:Java
-
本篇文章主要介绍如何在 Java 中制造程序延迟。本教程介绍了如何在 Java 中制造程序延时,并列举了一些示例代码来了解它。
如何在 Java 中把 Hashmap 转换为 JSON 对象
发布时间:2023/12/17 浏览次数:187 分类:Java
-
它描述了允许我们将哈希图转换为简单的 JSON 对象的方法。本文介绍了在 Java 中把 Hashmap 转换为 JSON 对象的方法。我们将看到关于创建一个 hashmap,然后将其转换为 JSON 对象的详细例子。
如何在 Java 中按值排序 Map
发布时间:2023/12/17 浏览次数:171 分类:Java
-
本文介绍了如何在 Java 中按值对 Map 进行排序。本教程介绍了如何在 Java 中按值对 Map
如何在 Java 中打印 HashMap
发布时间:2023/12/17 浏览次数:192 分类:Java
-
本帖介绍了如何在 Java 中打印 HashMap。本教程介绍了如何在 Java 中打印 HashMap 元素,还列举了一些示例代码来理解这个主题。
在 Java 中更新 Hashmap 的值
发布时间:2023/12/17 浏览次数:146 分类:Java
-
本文介绍了如何在 Java 中更新 HashMap 中的一个值。本文介绍了如何在 Java 中使用 HashMap 类中包含的两个方法-put() 和 replace() 更新 HashMap 中的值。
Java 中的 hashmap 和 map 之间的区别
发布时间:2023/12/17 浏览次数:79 分类:Java
-
本文介绍了 Java 中的 hashmap 和 map 接口之间的区别。本教程介绍了 Java 中 Map 和 HashMap 之间的主要区别。在 Java 中,Map 是用于以键值对存储数据的接口,
在 Java 中获取用户主目录
发布时间:2023/12/17 浏览次数:218 分类:Java
-
这篇文章向你展示了如何在 Java 中获取用户主目录。本教程介绍了如何在 Java 中获取用户主目录,并列出了一些示例代码以指导你完成该主题。
Java 中 size 和 length 的区别
发布时间:2023/12/17 浏览次数:179 分类:Java
-
这篇文章教你如何知道 Java 中大小和长度之间的区别。本教程介绍了 Java 中大小和长度之间的区别。我们还列出了一些示例代码以帮助你理解该主题。
Java 中的互斥锁
发布时间:2023/12/17 浏览次数:111 分类:Java
-
了解有关 Java 中互斥锁的一切,在计算机科学领域,互斥或互斥被称为并发控制的属性。每台计算机都使用称为线程的最小程序指令序列。有一次,计算机在一个线程上工作。为了更好地理解,

