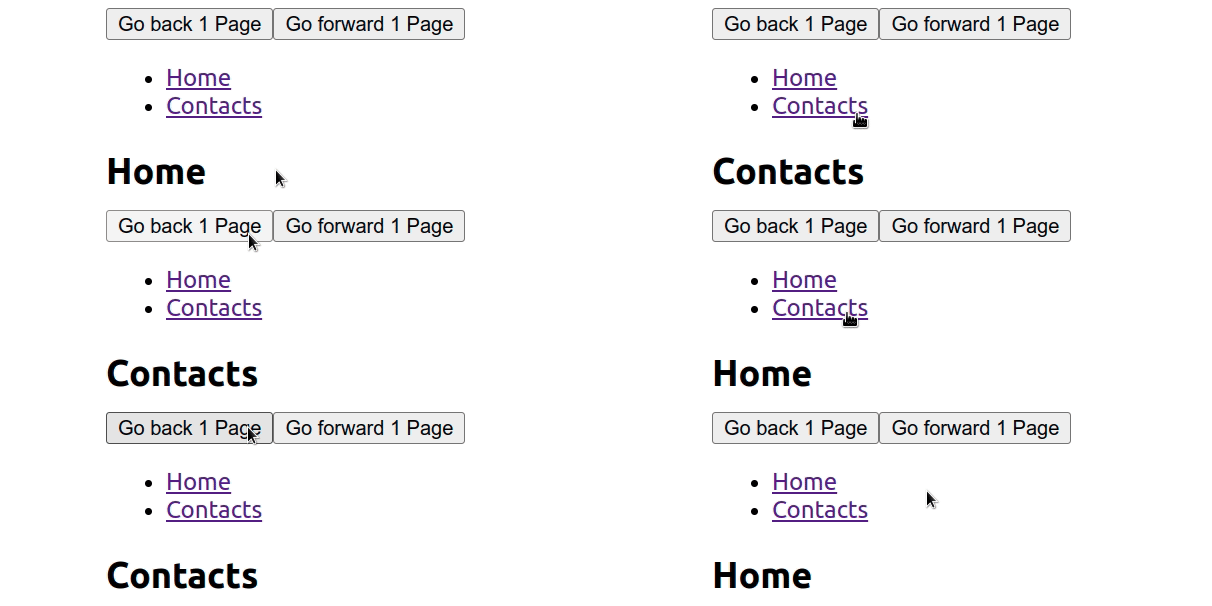
Creating a Back Button with React Router
To create a back button using React Router:
-
Set the property on the button
onClickto the function. -
Use
useNavigate()hooks, for exampleconst navigate = useNavigate();. -
Call
navigate()the function, passing it-1 - navigate(-1).
import {Link, Routes, Route, useNavigate} from 'react-router-dom';

export default function App() {
  const navigate = useNavigate();

  return (
    <div>
      <button onClick={() => navigate(-1)}>Go back 1 Page</button>
      <button onClick={() => navigate(1)}>Go forward 1 Page</button>

      <div>
        <nav>
          <ul>
            <li>
              <Link to="/">Home</Link>
            </li>
            <li>
              <Link to="/contacts">Contacts</Link>
            </li>
          </ul>
        </nav>

        {/* 👇️ Wrap your Route components in a Routes component */}
        <Routes>
          <Route path="/contacts" element={<Contacts />} />
          <Route path="/" element={<Home />} />
        </Routes>
      </div>
    </div>
  );
}

function Home() {
  return <h2>Home</h2>;
}

function Contacts() {
  return <h2>Contacts</h2>;
}

useNavigateThe hook returns a function that lets us navigate programmatically, such as after submitting a form or clicking a button.
To return to the previous page, pass -1 as an argument to
navigate()the function, for examplenavigate(-1).
Invoking navigation with -1 is the same as clicking the back button in your browser.
Likewise, we can call the function with -2navigate to go back 2 pages.
We can also use navigatefunctions to programmatically navigate to different routes, navigate(/contacts)e.g.
import {useNavigate} from 'react-router-dom'; export default function App() { const navigate = useNavigate(); const handleClick = () => { // 👇️ replace set to true navigate('/contacts', {replace: true}); }; return ( <div> <button onClick={handleClick}>Navigate to /contacts</button> </div> ); }
When the replace property optionsof a object is set to true , the current entry in the history stack will be replaced by the new entry.
In other words, navigating to a new route will not push a new entry into the history stack, so if the user clicks the back button, they will not be able to navigate to the previous page.
This is useful, for example, when a user is logged in - we don't want them to be able to click the back button and return to the login page.
Or if we have a route that will use redirects to different pages - we don't want the user to click the back button and be redirected again.
If we need to navigate forward one page, call 1 - navigate(1)navigation using .
To use the hook in your application useNavigate, make sure the component in your index.jsApp file is wrapped in a router.
import {createRoot} from 'react-dom/client';
import App from './App';
import {BrowserRouter as Router} from 'react-router-dom';

const rootElement = document.getElementById('root');
const root = createRoot(rootElement);

// 👇️ wrap App in Router
root.render(
  <Router>
    <App />
  </Router>
);
The best place to wrap your React application with the Router component is in the index.js file, since this is the entry point for your React application.
Once your entire app Routeris wrapped in a component, you can use any hook from the react router package anywhere in the component.
For reprinting, please send an email to 1244347461@qq.com for approval. After obtaining the author's consent, kindly include the source as a link.
Related Articles
How to avoid cross-origin (CORS) issues in React/Next.js
Publish Date:2025/03/17 Views:170 Category:NETWORK
-
In this article, we will introduce how to avoid cross-origin (CORS) issues in React/Next.js. Cross-origin resource sharing (CORS) is a protocol that defines how web requests should be handled when crossing different URLs.
React Tutorial - Transferring Props
Publish Date:2025/03/16 Views:188 Category:React
-
React transfers Props. Props are generated when components are encapsulated. Components expose some properties (Props) to the outside world to complete some functions.
React Tutorial: Props Anti-Pattern
Publish Date:2025/03/16 Views:187 Category:React
-
React's Props anti-pattern, using Props to generate state in getInitialState is an anti-pattern - Anti-Pattern.
React Tutorial - Props Validation
Publish Date:2025/03/16 Views:102 Category:React
-
Props validation is a very useful way to use components correctly. It can avoid many bugs and problems as your application becomes more and more complex. In addition, it can make your program more readable.
React tutorial: Types of Props for child components
Publish Date:2025/03/16 Views:172 Category:React
-
Usually, the child components of a React component are a group, that is, the child components are an array. Introduction to Type of the Children Props.
How to solve the error Uncaught TypeError: Cannot read properties of undefined in
Publish Date:2025/03/16 Views:153 Category:React
-
In the process of React development, we often encounter some errors. Here we look at an error reported in App.js. The error is as follows: App.js:69 Uncaught TypeError: Cannot read properties of undefined (reading 'setState') at onInput
Why do you need to bind event handlers in React Class Components?
Publish Date:2025/03/16 Views:60 Category:React
-
When using React, we must have come across control components and event handlers. We need to use `.bind()` in the constructor of the custom component to bind these methods to the component instance. As shown in the following code:
Solution to the error "does not contain a default export" in React
Publish Date:2025/03/16 Views:191 Category:React
-
When we try to use `default import` to import from a module that does not have a `default export`, we get a "does not contain a default export" error. To fix the error, make sure the module has named exports and wrap the import in curly braces, e.g.
Error in React: Attempted import error 'X' is not exported from Solution
Publish Date:2025/03/16 Views:78 Category:React
-
In React, the error “Attempted import error 'X' is not exported from” in React.js occurs when we try to import a named import that does not exist in the specified file. To fix the error, make sure the module has named exports and you have not obfu

