Drag and drop in Angular
We will introduce @angular/cdk/drag-dropthe module to accomplish drag and drop in angular.
We will also walk through some examples of drag and drop in Angular.
Drag and drop in Angular
@angular/cdk/drag-dropThe module provides you with a way to easily and declaratively create drag and drop interfaces. The module supports free dragging, sorting within lists, transferring items between lists, animations, touch devices, custom drag handles, previews and placeholders.
getting Started
First, we'll DragDropModuleimport app.module.tsthe NgModule.
Here is app.module.tsthe code for .
# angular
import { NgModule } from "@angular/core";
import { CommonModule } from "@angular/common";
import { BrowserModule } from "@angular/platform-browser";
import { BrowserAnimationsModule } from "@angular/platform-browser/animations";
import { DragDropModule } from "@angular/cdk/drag-drop";

import { AppComponent } from "./app.component";

@NgModule({
  imports: [
    BrowserModule,
    BrowserAnimationsModule,
    CommonModule,
    DragDropModule
  ],
  declarations: [AppComponent],
  bootstrap: [AppComponent]
})
export class AppModule {}
Now we import the following code into our app.component.ts.
# angular
import { Component, NgModule, ViewChild } from "@angular/core";
import {
  CdkDrag,
  CdkDragStart,
  CdkDropList,
  CdkDropListGroup,
  CdkDragMove,
  CdkDragEnter,
  moveItemInArray
} from "@angular/cdk/drag-drop";
import { ViewportRuler } from "@angular/cdk/overlay";

@Component({
  selector: "my-app",
  templateUrl: "./app.component.html",
  styleUrls: ["./app.component.css"]
})
Now we will export our class AppComponentand app.component.tsdefine variables in
# angular
export class AppComponent {
  @ViewChild(CdkDropListGroup) listGroup: CdkDropListGroup<CdkDropList>;
  @ViewChild(CdkDropList) placeholder: CdkDropList;

  public items: Array<number> = [1, 2, 3, 4, 5, 6, 7, 8, 9, 10, 11, 12];

  public target: CdkDropList;
  public targetIndex: number;
  public source: CdkDropList;
  public sourceIndex: number;
  public dragIndex: number;
  public activeContainer;

  constructor(private viewportRuler: ViewportRuler) {
    this.target = null;
    this.source = null;
  }
Now we will app.component.tsadd the view initialization function in
# angular
ngAfterViewInit() {
    let phElement = this.placeholder.element.nativeElement;

    phElement.style.display = "none";
    phElement.parentElement.removeChild(phElement);
  }
Now we will app.component.tscreate a add()function for to add elements to the list.
# angular
add() {
    this.items.push(this.items.length + 1);
  }
Now we'll create a function to shuffle app.component.tsthe list we have in .
#angular
shuffle() {
    this.items.sort(function() {
      return 0.5 - Math.random();
    });
  }
Now we'll create dragMovedthe function that drags app.component.tsthe elements in .
# angular
dragMoved(e: CdkDragMove) {
    let point = this.getPointerPositionOnPage(e.event);

    this.listGroup._items.forEach(dropList => {
      if (__isInsideDropListClientRect(dropList, point.x, point.y)) {
        this.activeContainer = dropList;
        return;
      }
    });
  }
Now we will app.component.tscreate dropListDroppedthe function in that will remove the element after it is released.
# angular
dropListDropped() {
    if (!this.target) return;

    let phElement = this.placeholder.element.nativeElement;
    let parent = phElement.parentElement;

    phElement.style.display = "none";

    parent.removeChild(phElement);
    parent.appendChild(phElement);
    parent.insertBefore(
      this.source.element.nativeElement,
      parent.children[this.sourceIndex]
    );

    this.target = null;
    this.source = null;

    if (this.sourceIndex != this.targetIndex)
      moveItemInArray(this.items, this.sourceIndex, this.targetIndex);
    console.log("save here!", this.items);
  }
Now we will get the point on the page that the user touched before dropping the element.
We will app.component.tsadd getPointerPositionOnPagethe function
# angular
getPointerPositionOnPage(event: MouseEvent | TouchEvent) {
    const point = __isTouchEvent(event)
      ? event.touches[0] || event.changedTouches[0]
      : event;
    const scrollPosition = this.viewportRuler.getViewportScrollPosition();

    return {
      x: point.pageX - scrollPosition.left,
      y: point.pageY - scrollPosition.top
    };
  }
Now we'll add onClickthe function that will be executed when the user clicks a list element.
# angular
onClick(event) {
    console.log(event);
    alert("click!");
  }
Now we add the following function to app.component.ts.
function __indexOf(collection, node) {
  return Array.prototype.indexOf.call(collection, node);
}

function __isTouchEvent(event: MouseEvent | TouchEvent): event is TouchEvent {
  return event.type.startsWith("touch");
}

function __isInsideDropListClientRect(
  dropList: CdkDropList,
  x: number,
  y: number
) {
  const {
    top,
    bottom,
    left,
    right
  } = dropList.element.nativeElement.getBoundingClientRect();
  return y >= top && y <= bottom && x >= left && x <= right;
}
Therefore, our app.component.tsfile will look like this.
# angular
import { Component, NgModule, ViewChild } from "@angular/core";
import {
  CdkDrag,
  CdkDragStart,
  CdkDropList,
  CdkDropListGroup,
  CdkDragMove,
  CdkDragEnter,
  moveItemInArray
} from "@angular/cdk/drag-drop";
import { ViewportRuler } from "@angular/cdk/overlay";

@Component({
  selector: "my-app",
  templateUrl: "./app.component.html",
  styleUrls: ["./app.component.css"]
})
export class AppComponent {
  @ViewChild(CdkDropListGroup) listGroup: CdkDropListGroup<CdkDropList>;
  @ViewChild(CdkDropList) placeholder: CdkDropList;

  public items: Array<number> = [1, 2, 3, 4, 5, 6, 7, 8, 9, 10, 11, 12];

  public target: CdkDropList;
  public targetIndex: number;
  public source: CdkDropList;
  public sourceIndex: number;
  public dragIndex: number;
  public activeContainer;

  constructor(private viewportRuler: ViewportRuler) {
    this.target = null;
    this.source = null;
  }

  ngAfterViewInit() {
    let phElement = this.placeholder.element.nativeElement;

    phElement.style.display = "none";
    phElement.parentElement.removeChild(phElement);
  }

  add() {
    this.items.push(this.items.length + 1);
  }

  shuffle() {
    this.items.sort(function() {
      return 0.5 - Math.random();
    });
  }

  dragMoved(e: CdkDragMove) {
    let point = this.getPointerPositionOnPage(e.event);

    this.listGroup._items.forEach(dropList => {
      if (__isInsideDropListClientRect(dropList, point.x, point.y)) {
        this.activeContainer = dropList;
        return;
      }
    });
  }

  dropListDropped() {
    if (!this.target) return;

    let phElement = this.placeholder.element.nativeElement;
    let parent = phElement.parentElement;

    phElement.style.display = "none";

    parent.removeChild(phElement);
    parent.appendChild(phElement);
    parent.insertBefore(
      this.source.element.nativeElement,
      parent.children[this.sourceIndex]
    );

    this.target = null;
    this.source = null;

    if (this.sourceIndex != this.targetIndex)
      moveItemInArray(this.items, this.sourceIndex, this.targetIndex);
    console.log("save here!", this.items);
  }

  dropListEnterPredicate = (drag: CdkDrag, drop: CdkDropList) => {
    if (drop == this.placeholder) return true;

    if (drop != this.activeContainer) return false;

    let phElement = this.placeholder.element.nativeElement;
    let sourceElement = drag.dropContainer.element.nativeElement;
    let dropElement = drop.element.nativeElement;

    let dragIndex = __indexOf(
      dropElement.parentElement.children,
      this.source ? phElement : sourceElement
    );
    let dropIndex = __indexOf(dropElement.parentElement.children, dropElement);

    if (!this.source) {
      this.sourceIndex = dragIndex;
      this.source = drag.dropContainer;

      phElement.style.width = sourceElement.clientWidth + "px";
      phElement.style.height = sourceElement.clientHeight + "px";

      sourceElement.parentElement.removeChild(sourceElement);
    }

    this.targetIndex = dropIndex;
    this.target = drop;

    phElement.style.display = "";
    dropElement.parentElement.insertBefore(
      phElement,
      dropIndex > dragIndex ? dropElement.nextSibling : dropElement
    );
    this.placeholder._dropListRef.enter(
      drag._dragRef,
      drag.element.nativeElement.offsetLeft,
      drag.element.nativeElement.offsetTop
    );

    return false;
  };

    const point = __isTouchEvent(event)
      ? event.touches[0] || event.changedTouches[0]
      : event;
    const scrollPosition = this.viewportRuler.getViewportScrollPosition();

    return {
      x: point.pageX - scrollPosition.left,
      y: point.pageY - scrollPosition.top
    };
  }

  onClick(event) {
    console.log(event);
    alert("click!");
  }
}

function __indexOf(collection, node) {
  return Array.prototype.indexOf.call(collection, node);
}

function __isTouchEvent(event: MouseEvent | TouchEvent): event is TouchEvent {
  return event.type.startsWith("touch");
}

function __isInsideDropListClientRect(
  dropList: CdkDropList,
  x: number,
  y: number
) {
  const {
    top,
    bottom,
    left,
    right
  } = dropList.element.nativeElement.getBoundingClientRect();
  return y >= top && y <= bottom && x >= left && x <= right;
}
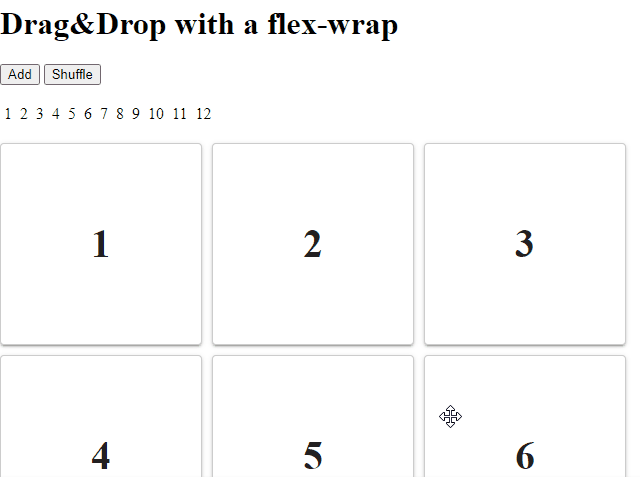
Now we will create a frontend and app.component.htmladd the following code in .
<h1>Drag&Drop with a flex-wrap</h1>
<button (click)="add()">Add</button> <button (click)="shuffle()">Shuffle</button
><br />
<ul class="angular-list">
  <li *ngFor="let item of items">{{ item }}</li>
</ul>

<div class="amgular-container" cdkDropListGroup>
  <div
    cdkDropList
    [cdkDropListEnterPredicate]="dropListEnterPredicate"
    (cdkDropListDropped)="dropListDropped()"
  ></div>
  <div
    cdkDropList
    *ngFor="let item of items"
    [cdkDropListEnterPredicate]="dropListEnterPredicate"
    (cdkDropListDropped)="dropListDropped()"
  >
    <div
      cdkDrag
      class="angular-box"
      (cdkDragMoved)="dragMoved($event)"
      (click)="onClick($event)"
    >
      {{ item }}
    </div>
  </div>
</div>
We will app.component.cssadd our style code in .
# angular
.angular-list {
  list-style-type: none;
  padding: 0;
}

.angular-list li {
  display: table-cell;
  padding: 4px;
}

.angular-container {
  display: flex;
  flex-wrap: wrap;
}

.angular-box {
  width: 200px;
  height: 200px;
  border: solid 1px #ccc;
  font-size: 30pt;
  font-weight: bold;
  color: rgba(0, 0, 0, 0.87);
  cursor: move;
  display: flex;
  justify-content: center;
  align-items: center;
  text-align: center;
  background: #fff;
  border-radius: 4px;
  position: relative;
  z-index: 1;
  transition: box-shadow 200ms cubic-bezier(0, 0, 0.2, 1);
  box-shadow: 0 3px 1px -2px rgba(0, 0, 0, 0.2), 0 2px 2px 0 rgba(0, 0, 0, 0.14),
    0 1px 5px 0 rgba(0, 0, 0, 0.12);
}

.angular-box:active {
  box-shadow: 0 5px 5px -3px rgba(0, 0, 0, 0.2),
    0 8px 10px 1px rgba(0, 0, 0, 0.14), 0 3px 14px 2px rgba(0, 0, 0, 0.12);
  opacity: 0.6;
}

.cdk-drop-list {
  display: flex;
  padding-right: 15px;
  padding-bottom: 15px;
}

.cdk-drag-preview {
  box-sizing: border-box;
  border-radius: 4px;
  box-shadow: 0 5px 5px -3px rgba(161, 41, 41, 0.2),
    0 8px 10px 1px rgba(141, 58, 58, 0.14), 0 3px 14px 2px rgba(0, 0, 0, 0.12);
}

.cdk-drag-placeholder {
  opacity: 0.5;
}

.cdk-drag-animating {
  transition: transform 250ms cubic-bezier(0, 0, 0.2, 1);
}

button {
  margin-right: 4px;
}
Now our output will look like this.
Output:
For reprinting, please send an email to 1244347461@qq.com for approval. After obtaining the author's consent, kindly include the source as a link.
Related Articles
Setting default option value for Select From Typescript in AngularJs
Publish Date:2025/04/18 Views:185 Category:Angular
-
select Is an HTML tag that contains n an option subtag that contains a value attribute. This tutorial guide will provide how to select default option value from TypeScript in AngularJs if the user does not select any specific defined value.
Enabling HTML5 mode in AngularJS
Publish Date:2025/04/18 Views:148 Category:Angular
-
This article will guide you through enabling HTML5 mode with deep linking on your AngularJS application. Using HTML5 mode in AngularJS $locationProvider.html5Mode pushState is a way to tell the browser that it needs to use HTML5 mode for UR
Loading spinner in AngularJs
Publish Date:2025/04/18 Views:133 Category:Angular
-
We will cover how to add a loading spinner while the request is loading and stop the loader while data is loading in AngularJs. Loading spinner in AngularJs Loaders are a part of web applications to make them user-friendly and improve the u
Showing and hiding in Angular
Publish Date:2025/04/18 Views:91 Category:Angular
-
We will walk through examples of showing and hiding components or elements in Angular. Showing and hiding in Angular While developing business applications we need to hide some data based on user roles or conditions. We have to display the
Downloading files in Angular
Publish Date:2025/04/18 Views:164 Category:Angular
-
We will look at how to download a file in Angular by clicking a button and show an example. File downloading in Angular Downloading files in Angular is very easy. We can use HTML5 download attributes to download files. # angular a href = "F
Select an option in the Angular drop-down menu
Publish Date:2025/04/18 Views:112 Category:Angular
-
We will cover how to set the selected option in an Angular dropdown, set the selected option from an array of options, and set the selected option if the options are dynamic in Angular. Setting the selected option in an Angular dropdown men
在 Angular 下拉菜单中选择选项
Publish Date:2024/03/24 Views:210 Category:Angular
-
本教程演示了如何在 Angular 下拉菜单中设置选定的选项。
在 Angular 中上传文件
Publish Date:2023/04/14 Views:123 Category:Angular
-
本教程演示了如何在 Angular 中上传任何文件。我们还将介绍如何在文件上传时显示进度条,并在上传完成时显示文件上传完成消息。
Angular 中所有 Mat 图标的列表
Publish Date:2023/04/14 Views:189 Category:Angular
-
本教程演示了在哪里可以找到 Angular 中所有 Mat 图标的列表以及如何使用它们。

