Implementing a group chat room using socket.io
This article will share with you an example of using socket.io to realize the function of group chat. If you want to use socket.io, you must use nodejs to implement the server, so we need to install socket.io in nodejs
Install socket.io
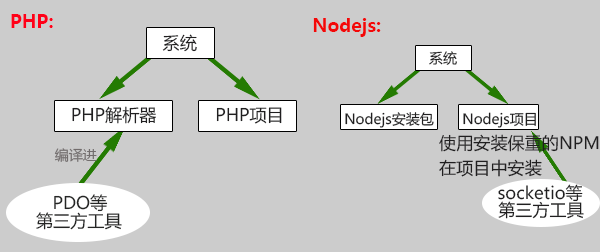
How to install socket.io in nodejs? For those who have just started learning nodejs, there may be some problems. Completing a nodejs project requires two parts, one is the installation directory of the nodejs tool, which is equivalent to the PHP parser, and the other is the nodejs code part. Socket.io can be said to be a toolkit of nodejs. If we have learned PHP, then if we need to use the extension tools in PHP, we need to recompile the PHP parser. But for nodejs, its third-party tools must be installed in the nodejs code part. We can use the following figure for comparison

Then let's introduce our directory structure.
First, our nodejs environment is in the root directory
/nodejs
Then our project directory
/www/nodejs
Next, we enter the project directory
# cd /www/nodejs
Then use the npm command under /nodejs/bin to install socket.io to the project directory
nodejs]# /nodejs/bin/npm install socket.io
After the installation is complete, we can create a new js file under the project directory, named socketserver.js
socketserver.js
var http = require('http').createServer(handle);
var io = require('socket.io')(http);
var url = require('url');
var files = require('fs');
http.listen(9999,"192.168.144.128");//监听9999端口
function handle(req,res){
files.readFile(__dirname + '/index.html',
function (err, data) {
if (err) {
res.writeHead(500);
return res.end('Error loading index.html');
}
res.writeHead(200);
res.end(data);
});
}
var onlineUsers = {};
//当前在线人数
var onlineCount = 0;
/**
* 用户连接
*/
io.on('connection',function(socket){
/**
* 监听新用户加入
*/
socket.on('login',function(obj){
io.emit('login',{username:obj.username});
onlineCount++
});
/**
* 发布消息
*/
socket.on('message',function(obj){
io.emit('message',{username:obj.username,userid:obj.userid,message:obj.message});
});
/**
* 上传文件
*/
socket.on('upfile',function(obj){
var dir = __dirname.substr(0,__dirname.lastIndexOf('module'));
var file = dir+"data/Upload/"+obj.filename;
files.open(file,'w',function(err,fd){
if(!err){
var option ={
flags: 'w',
encoding: null,
fd: fd,
mode: 0666
};
var ws = files.createWriteStream(file,option);
ws.write(obj.message);
io.emit('upfile',{username:obj.username,userid:obj.userid,message:"/data/Upload/"+obj.filename});
}
});
console.log(dir);
});
});
上面是服务端代码
接下来完成客户端的代码
chatclient.js
var CHAT = {
username:null,
userid: null,
message:null,
}
var socket = io.connect('ws://192.168.144.128:9999');
socket.on('login',function(obj){
var con = $('#chat_show .show_message').html()+"<br />"+obj.username+'---joined';
$('#chat_show .show_message').html(con);
});
socket.on('message',function(obj){
var info = '';
if(CHAT.userid == obj.userid){
info = "<span style='display:block;width:100%;text-align:right;'>"+obj.username+': '+obj.message+"</span>";
}else{
info = "<span style='display:block;width:100%;text-align:left;'>"+obj.username+': '+obj.message+"</span>";
}
var con = $('#chat_show .show_message').html()+info;
$('#chat_show .show_message').html(con);
});
socket.on('upfile',function(obj){
var info = '';
if(CHAT.userid == obj.userid){
info = "<span style='display:block;width:100%;text-align:right;'>"+obj.username+":<img src='"+obj.message+"' width='100' height='100' /></span>";
}else{
info = "<span style='display:block;width:100%;text-align:left;'>"+obj.username+": <img src='"+obj.message+"' width='100' height='100' /></span>";
}
var con = $('#chat_show .show_message').html()+info;
$('#chat_show .show_message').html(con);
});
socket.emit('login',{username:CHAT.username});
以上是客户端的核心代码
综合以上的代码,有两个知识点需要注意。
一是 socket.on(“事件名称”,function(){处理代码})。不管是在服务端还是在客户端,这是在socket上开启一个方法,进行监听,一旦有数据向这个方法发送数据,就会调用后面的function()进行处理。
那如何向这个事件发送数据,那就需要用到 socket.emit(“事件名称”,数据);来向对方发送数据,双方的事件名称是相互对应的。客户端的emit-事件名称对应服务端的 on-事件名称;服务端的emit-事件名称对应于客户端的on-事件名称。
如此我们就完成了群聊天的功能,当然上述代码是不完整的,不过核心的代码都在上面,缺少的就是页面了。大家可以根据上面的代码自行进行扩展,制作出更强大的网页聊天室。如果有什么问题请在下面留言讨论,大家共同提高
For reprinting, please send an email to 1244347461@qq.com for approval. After obtaining the author's consent, kindly include the source as a link.
Related Articles
PHP with Ajax
Publish Date:2025/04/13 Views:139 Category:PHP
-
We will use PHP and ajax by printing a simple sum of two numbers 2 and . Also, print a php array in JSON. 3 object We will also use PHP with ajax by getting the HTML formatted output from the number division in PHP. Printing simple addition
How to use the Linux file remote copy command scp
Publish Date:2025/04/08 Views:151 Category:OPERATING SYSTEM
-
Scp copies files between two hosts over the network, and the data is encrypted during transmission. Its underlying layer uses ssh for data transmission. And it has the same authentication mechanism and the same security level as ssh. When u
Nodejs automatically restarts after modifying the code
Publish Date:2025/04/08 Views:93 Category:OPERATING SYSTEM
-
NodeJs can automatically restart after modifying the code, saving us the trouble of ctr+c and then using node. But in terms of time, if the project is already online and running normally, and there are not many modifications, then we can do
Adding network mode in Docker Compose
Publish Date:2025/03/25 Views:138 Category:Docker
-
By default, a single network is created by Docker Compose in our application and each container is added there as a service. Every container on the network can be accessed and found by containers on the single network. We can configure our
Using Docker network host commands
Publish Date:2025/03/24 Views:51 Category:Docker
-
Docker containers work by leveraging network drivers that are created during the installation of Docker. The default drivers available to us include bridge and host networking. When we create containers without specifying a network, they ar
Mapping a network drive in a batch script
Publish Date:2025/03/21 Views:72 Category:OPERATING SYSTEM
-
This article will discuss how to map a network drive in a batch script. Mapping a network drive in a batch script For this purpose, we will see three formats of the same command. However, the general format of the command is: net use P: "\\
What multipart/form-data does in post Upload upload files
Publish Date:2025/03/18 Views:64 Category:NETWORK
-
Everyone has used the attribute enctype="multipart/form-data" when uploading files using a form. What is the role of multipart/form-data? Let's talk about this topic. First, let's look at a case Look at the first code form action= "handl
About application/x-www-form-urlencoded
Publish Date:2025/03/18 Views:148 Category:NETWORK
-
As a data format of form, application/x-www-form-urlencoded has its own characteristics form action= "handle.php" method= "post" input type= "text" name= " uname" class= " uname" /br / input type= "text" name= "email" class=
My understanding of webservice is this
Publish Date:2025/03/18 Views:150 Category:NETWORK
-
Recently, I encountered such a project at work (temporarily named Project A). Project A itself was developed in PHP, but its data came from another project developed in Java (temporarily named Project B). Project A could not operate the dat

